@davidalgarve that sounds like the recommended method, I think the other way is to press and hold 'mode' for 7 seconds to reveal an Access Point
(I think it's like one of those games that you have to hit 7.00s for it to work though! 🙂)
Posted by: @morganI am in a very similar boat to you. I've actually purchased the dongle, and as soon as it arrived, my confidence deserted me. I occasionally look at the box with a screwdriver in hand and just deflate. 😀
However, I understood that the dongle fits the indoor control box as opposed to the main ASHP.
I can easily understand that. Here are my additions to what @f1p and @sand have posted.
Firstly, for someone not already familiar with the FTC box, a lot of the advice online is good but misses the odd important familiarisation step. There are two points to note.
- The FTC gets its power from the outside box so in order to isolate it to work on you have to turn the outside box off. I'd assume most (all?) are installed as mine is in that there's a nice big red isolator switch close to the Ecodan that you can turn off.
- Once you've taken the cover off the FTC box (two screws at the bottom, two at the top) you shouldn't see any little LED lights; if you can, power's still on so revisit point one. Nonetheless, when you survey the scene you'll recognise the layout from the many pictures posted. However, almost all of those pictures are followed up with a close-up of the CN105 socket with no mention made of where on the board you should focus on. @sand mentioned following the wire from the wireless dongle to the CN105 socket and that's great but if your installer has been tidy then there may be a mass of other wires loosely cable-tied together making tracing a wire awkward. For clarity, @f1p's post ( https://renewableheatinghub.co.uk/forums/postid/53111/) gives a very good indicator of where the CN105 socket is and it's the only red socket of that shape on the board.
Secondly, when you first power the heat pump back up again, the new little dongle will be in its default configuration; we'll come back to that in a moment. More importantly, as long as you've plugged the Melcloud wifi adapter back into the second socket on the new dongle, the new dongle is, as far as the wifi adapter is concerned, just another bit of wire. Everything being presented to the CN105 slot at the board is being passed through to the wifi adapter and therefore onwards to Melcloud. If you want to, you can verify that before going any further, and Melcloud should just see that all as a power cut that's fixed now, just as @f1p mentioned later.
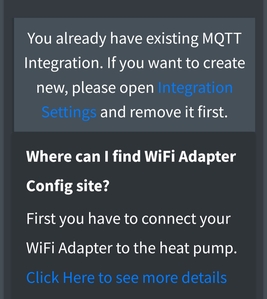
Thirdly, the new bit of kit you've just installed. As I mentioned before, it'll be in its default vanilla mode which means it'll be acting as a wifi hotspot and this is where the instructions you get with it should make sense. Taking your phone with you, disconnecting from your wifi and then connecting it to the dongle's hotspot (wifi network called Ecodan Bridge AP) means you'll be able to use your phone's browser to connect to http://192.168.4.1 to open up the dongle's configuration page. The only thing you actually need to do here is to configure the dongle's wifi by adding the wifi network's name and password since once the dongle is connected to wifi and on the network you can connect to it again from a proper PC and have a keyboard, mouse and big screen to work with. However, if you know the MQTT details you can by all means add them at this stage. Either way, once you've made the changes you need to, make sure you go down to the bottom of the page and press save. If you do choose to put in the MQTT stuff later, accessing the dongle once it's on your normal home network is simple a matter of using your PC's browser and going to http://heatpump.local.
Now, specifically for @morgan, whether you add the MQTT details at the same time as connecting the dongle to wifi or whether you do it later, the MQTT server you need to add is your home assistant box (i.e. just adding "homeassistant.local" should do). The username and password are the ones you set up a couple of weeks ago and made a note of (i.e. a homeassistant user), and the rest should be OK to leave as is (port 1883 and primary MQTT base topic of Ecodan/ASHP). Once you've put those details in and saved, the dongle will start shouting at the Mosquitto broker you set up on Home Assistant. If you then go to Home Assistant, go to the cog that takes you to the settings and then navigate to Devices and Services, Home Assistant should now be telling you it's discovered a new MQTT device. You can then do exactly the same to that device as you did with everything else your Home Assistant has discovered (adding to dashboards etc.). If you get to the "Hey, I've discovered a new MQTT device" and can't remember what to do, just post again and I can run you through it.
105 m2 bungalow in South East England
Mitsubishi Ecodan 8.5 kW air source heat pump
18 x 360W solar panels
1 x 6 kW GroWatt battery and SPH5000 inverter
1 x Myenergi Zappi
1 x VW ID3
Raised beds for home-grown veg and chickens for eggs
"Semper in excretia; sumus solum profundum variat"
Update.
Dongle came very quickly.
Set up was easy thanks, @majordennisbloodnok, I turned off the big red button.😁
Followed instructions, all good.
Still no COP but that's down to our systems failings.😔
Things I like.
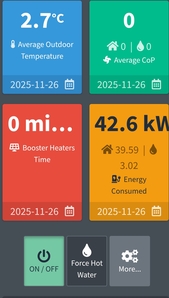
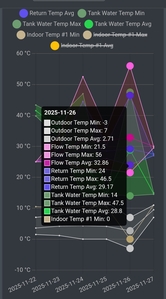
1. that I can see latest daily information all together.
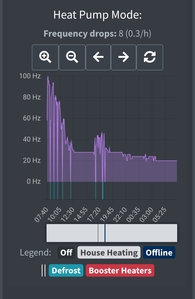
2. I can see latest defrosts, and frequency drops (had to google, no idea but at least I can see it 😀)
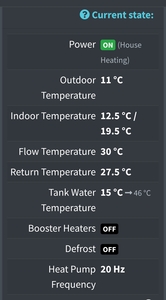
3. I can see the current information; - what's the temp outside what's the flow is it related to my WCC
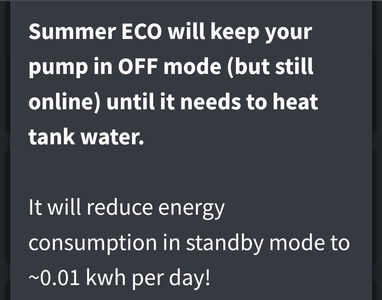
4. I'm also very interested in summer eco
Been away set it up last night so early days.
Hmm so you have - maybe you have it below and your screenshot is cutting off the data like flow rate, compressor starts, fan speed etc
PM me you MEL Pump App ID number under the Configuration page and i will take a look?
Lost me completely, I'm afraid. I haven't installed the dongle yet. As for the rest, I fail to see where I put any of "those details," etc.
Sad to say, but for me to grasp any of this, it needs to be broken down to 'idiot entry level'.
Retrofitted 11.2kw Mitsubishi Ecodan to new radiators commissioned November 2021.
14 x 500w Monocrystalline solar panels.
2 ESS Smile G3 10.1 batteries.
ESS Smile G3 5kw inverter.
I think we need to split this topic - we have identical hardware for the Home Assistant and MELPump adapter and you can swap/change between the two freely by uploading an update file.
But in terms of this discussion we are mixing conversations on setup and use of MELPump (original thread) and how to configure for Home Assistant use
Posted by: @morganLost me completely, I'm afraid. I haven't installed the dongle yet. As for the rest, I fail to see where I put any of "those details," etc.
Sad to say, but for me to grasp any of this, it needs to be broken down to 'idiot entry level'.
Worry not. If it isn’t clicking in your mind then saying so is exactly the right thing to do. That’s not “idiot entry level”; that’s sensible honesty and I can deal with that day in day out.
I’ll try to grab some screenshots and post them when I get a free moment or two, although that might not be today.
105 m2 bungalow in South East England
Mitsubishi Ecodan 8.5 kW air source heat pump
18 x 360W solar panels
1 x 6 kW GroWatt battery and SPH5000 inverter
1 x Myenergi Zappi
1 x VW ID3
Raised beds for home-grown veg and chickens for eggs
"Semper in excretia; sumus solum profundum variat"
May I cast a vote for F1p's suggestion of splitting up this discussion?
I have just signed up to MEL Pump and I am starting to learn what it has to offer, but I have no intention of changing from Hubitat to Home Assistant at my advanced years
342sq m "Upside down" house in Algarve. Portugal
Mitsubishi PUHZ-120YUK 12kW ASHP
12 Solar Panels Growatt Inverter
2 x Growatt 7.5kW Batteries
Fronius EV Charger
Kia e- Niro 64kW
- 27 Forums
- 2,495 Topics
- 57.8 K Posts
- 233 Online
- 6,220 Members
Join Us!
Worth Watching
Latest Posts
-
RE: Testing new controls/monitoring for Midea Clone ASHP
@benson Indeed they do fluctuate more than I would expe...
By Tasos , 6 seconds ago
-

@painter26 — as @jamespa says, it's for filling and re-...
By cathodeRay , 1 hour ago
-
RE: Humidity, or lack thereof... is my heat pump making rooms drier?
I'd be happy with what you have (so would millions of o...
By Deltona , 2 hours ago
-

RE: Oversized 10.5kW Grant Aerona Heat Pump on Microbore Pipes and Undersized Rads
@uknick TBH if I were taking the floor up ...
By JamesPa , 12 hours ago
-
RE: What determines the SOC of a battery?
@batpred Your BMS parameters will be the same as m...
By Bash , 13 hours ago
-

RE: Getting ready for export with a BESS
I would have not got it if it was that tight
By Batpred , 14 hours ago
-

RE: Setback savings - fact or fiction?
I also need to correct something I said by mistake earl...
By cathodeRay , 14 hours ago
-

RE: Electricity price predictions
@judith Thanks for sharing, and nice to see how the ...
By Batpred , 14 hours ago
-
RE: Need help maximising COP of 3.5kW Valiant Aerotherm heat pump
@judith thanks Judith. Confirmation appreciated. The ...
By DavidB , 17 hours ago
-

RE: Recommended home battery inverters + regulatory matters - help requested
That makes sense. I thought better to comment in this t...
By Batpred , 17 hours ago
-
Bosch CS5800i 7kW replacing Greenstar Junior 28i
My heat pump journey began a couple of years ago when I...
By Slartibartfast , 17 hours ago
-

RE: How to control DHW with Honeywell EvoHome on Trianco ActiveAir 5 kW ASHP
The last photo is defrost for sure (or cooling, but pre...
By JamesPa , 19 hours ago
-

RE: Plug and play solar. Thoughts?
Essentially, this just needed legislation. In Germany t...
By Batpred , 19 hours ago
-
RE: A Smarter Smart Controller from Homely?
@toodles Intentional opening of any warranty “can of wo...
By Papahuhu , 21 hours ago
-
RE: Safety update; RCBOs supplying inverters or storage batteries
Thanks @transparent Thankyou for your advic...
By Bash , 22 hours ago
-
RE: Air source heat pump roll call – what heat pump brand and model do you have?
Forum Handle: Odd_LionManufacturer: SamsungModel: Samsu...
By Odd_Lion , 22 hours ago
-
RE: Configuring third party dongle for Ecodan local control
Well, it was mentioned before in the early pos...
By F1p , 2 days ago
-

RE: DIY solar upgrade - Considering adding more panels
I know this is a bit old, but it made me wonder what co...
By Batpred , 2 days ago
-

RE: New Vaillant aroTherm Plus in black - When will it come to the UK?
@majordennisbloodnok Daikin, take note! (In fact, I hav...
By Toodles , 2 days ago
-

RE: Midea ASHP – how to set weather compensation
@mk4 — good work! First, I agree, no evidence of cycl...
By cathodeRay , 2 days ago
-

RE: Solis inverters S6-EH1P: pros and cons and battery options
I don't know about Solis inverters. It isn't a featur...
By Transparent , 2 days ago
-
Daikin Altherma 3 H HT - Freeze Prevention Threshold
Hi. We have an Altherma 3 HT (18kW I think) which, now ...
By RICHARDF5033 , 2 days ago
-
RE: Passiv Smart Thermostat - Help & Forum Support
@petch We are not yet compatible with the R290 from Gra...
By Will H , 2 days ago

