Configuring third party dongle for Ecodan local control
This is a spin-off thread from here in order to clarify and hopefully simplify the instructions given, particularly for @morgan.
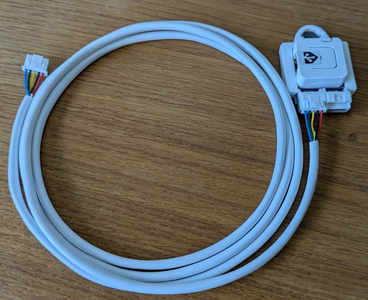
The bit of hardware we're discussing is this one. It's an adapter that plugs into the CN105 socket on the circuit board of the Ecodan's FTC (flow temperature controller) unit.
You should be able to see that, next to where the wire plugs into the little rectangular doohickey there's another empty socket. The idea is that, after turning off the heat pump so there's no power to the FTC, you remove the existing Mitsi wifi adapter from the CN105 socket on the circuit board and plug the free end of the long lead in the picture above into that socket in its place. You then plug the Mitsi wifi adapter back into that free socket I've just mentioned, effectively ending up with a really long lead between the FTC and the Mitsi wifi adapter, but with the new doohickey in the middle of the chain.
Once you're done with that, you can put the cover back on the FTC box and turn the heat pump on again. At this point, your Mitsi wifi adapter will connect again to Melcloud and you're in exactly the same situation you were before you started. In addition, once the power is on again, you'll see the little doohickey showing a blue LED. That means it's in its default config and ready to be set up.
Recapping for a moment (as outlined in the previous thread), a prerequisite for using this little box of tricks is that you've set up something for it to talk to - technically known as an MQTT broker (or server). @morgan, you've already done this by setting up the Mosquitto addon in Home Assistant, and creating a new Home Assistant user that'll be dedicated to just this conversation. The bits of information you'll need access to now are:
- the name of our home wifi network and the password to connect to it
- the name of your Home Assistant server (almost certainly homeassistant.local)
- the name and password for your new Home Assistant user you've set up for this job
Moving back to the doohickey again, whilst it's glowing blue it's acting like another wifi hotspot. Using your phone, you can go to the wifi settings and, instead of connecting to your home wifi network, you should be able to see and select a new wifi network called "Ecodan Bridge AP". As soon as you connect to that wifi network, you will be able to fire up your phone's browser and put in an address of http://192.168.4.1
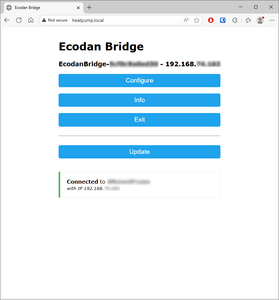
Once you've done that, you'll see the WiFiManager screen the documentation tells you about. It looks like this (except for being entitled "WiFiManager").
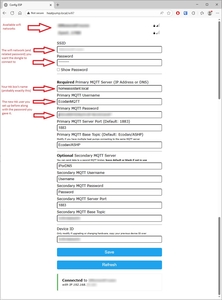
You need to click the Configure button and you'll see a new screen looking like this.
The bits you need to fill in are the ones I've marked with red arrows.
- The SSID and password are the name of your home wifi network and the password to connect to it.
- The primary MQTT server is the name of the Home Assistant box. Most likely you'll fill it in with exactly what I've got in my screenshot.
- The primary MQTT username and password are the username and password of the Home Assistant user you created.
If it's easy enough to fill all those bits in on your phone, do so, but the key is the wifi network/password combination so the little doohickey can be visible on your home network.
Once you've filled in the necessary fields, use the blue button at the bottom to save the config and then you can disconnect your phone and reconnect it to your home wifi again.
At this point, your new little doohickey should be glowing green which signifies it's connected to the wifi network successfully. If you should need to get back to that config page for any tweaking of MQTT settings, you can now do so much more easily by simply going to one of your home PCs, opening up a browser and going to https://heatpump.local.
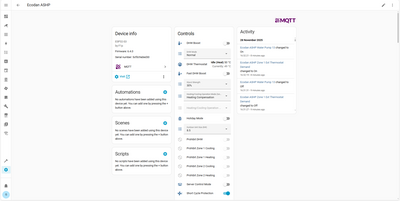
Now we move our attention to Home Assistant. If you go to your Home Assistant page and then, on the left-hand bar, click on the Settings cog you can navigate to your Devices and Services page. Assuming everything's been set up OK a few weeks ago you should now see a new device in the top left corner marked "MQTT". That'll be because Home Assistant has autodiscovered this new device talking MQTT to the broker. You can now click on that MQTT icon and it'll take you to a page that looks like this
Given you've used Home Assistant before, I'm guessing this won't look too unfamiliar for you, but at the bottom of each of the boxes in the middle column you'll have a link to "add to dashboard". This will add all the stuff in that box to a dashboard of your choosing so you can find it easily.
From that point, you've got your Ecodan added to your Home Assistant so it can do some local control, but you've also got the heat pump still talking with Melcloud so you can still do what you always did before and Havenwise can still do its stuff exactly as it was doing before. Nothing lost and much gained.
The only thing remaining now is, as @sheriff-fatman said, to tidy up your dashboard(s) so you can see key information easily rather than just be presented with a sea of good but potentially irrelevant bits of data.
Does that help?
105 m2 bungalow in South East England
Mitsubishi Ecodan 8.5 kW air source heat pump
18 x 360W solar panels
1 x 6 kW GroWatt battery and SPH5000 inverter
1 x Myenergi Zappi
1 x VW ID3
Raised beds for home-grown veg and chickens for eggs
"Semper in excretia; sumus solum profundum variat"
Thanks for this. Ironically, I ordered the dongle earlier today so will be doing some 'doohickery' along these line at some stage soon too, so this is great general information.
I've also (by searching for "Home Assistant" in the forums) stumbled across your 4 part article from last year about HA, which I'm in the middle of reading. It's reassuring to see that I've managed to pick up enough of the basics myself over the last couple of days, but I suspect I'll be searching for more of your posting history on the forum in due course.
Your setup sounds very similar to mine, in general terms, with the only obvious fundamental difference being the inverter architecture (Growatt vs Sunsynk), and I've already managed to get the Sunsynk to spit out it's basic data into HA, which felt like one of the early victories on the HA learning curve. It's reading data only at the moment. I'll worry about whether I want it to do any sort of smart control down the line from here.
130m2 4 bed detached house in West Yorkshire
10kW Mitsubishi Ecodan R290 Heat Pump - Installed June 2025
6.3kWp PV, 5kW Sunsynk Inverter, 3 x 5.3kWh Sunsynk Batteries
MyEnergi Zappi Charger for 1 EV (Ioniq5) and 1 PHEV (Outlander)
User of Havenwise (Full control Jun-Dec 2025, DHW only from early Dec)
Subscriber to MelPump App data via CN105 Dongle Kit
Posted by: @sheriff-fatmanThanks for this. Ironically, I ordered the dongle earlier today so will be doing some 'doohickery' along these line at some stage soon too, so this is great general information.
I've also (by searching for "Home Assistant" in the forums) stumbled across your 4 part article from last year about HA, which I'm in the middle of reading. It's reassuring to see that I've managed to pick up enough of the basics myself over the last couple of days, but I suspect I'll be searching for more of your posting history on the forum in due course.
Your setup sounds very similar to mine, in general terms, with the only obvious fundamental difference being the inverter architecture (Growatt vs Sunsynk), and I've already managed to get the Sunsynk to spit out it's basic data into HA, which felt like one of the early victories on the HA learning curve. It's reading data only at the moment. I'll worry about whether I want it to do any sort of smart control down the line from here.
Thanks, @sheriff-fatman. Happy for you to search any posting history but just as happy for you to post any queries you have and I'll share whatever I can.
Yes the setup is pretty similar, and even the inverter brand doesn't make all that much difference. The only key thing is how you choose to interact with the inverter; I've gone for local control via modbus and I suspect there's a comparable modbus alternative for Sunsynk. However, once that's set up the concepts of "in this situation do such and such" are exactly the same.
I do happen to be an Octopus customer with the Octopus HA integration and also the Octopus Energy Rates card. If you need a hand setting it all up then most of the info is in my articles but shout if anything's unclear.
105 m2 bungalow in South East England
Mitsubishi Ecodan 8.5 kW air source heat pump
18 x 360W solar panels
1 x 6 kW GroWatt battery and SPH5000 inverter
1 x Myenergi Zappi
1 x VW ID3
Raised beds for home-grown veg and chickens for eggs
"Semper in excretia; sumus solum profundum variat"
@majordennisbloodnok The dongle arrived today, and I've just completed the hardware setup successfully (got the green light on the dongle, etc). I can see figures in Home Assistant where the MQTT is now showing figures on the dashboard, but am currently waiting to see figures pull through into the Mel Pump app. I now have two separate integrations, as there was an existing MelCloud one, but the new MQTT device currently doesn't show any info.
It's possible that this is because the heat pump is sitting idle currently, or that the device is using the imported MelCloud data for the remainder of today (nothing has updated within MelPump since 10:05pm, which is unusual, as it's normally a live view.
The location of the white box was a real challenge, particularly getting the top two screws off, but I succeeded eventually. I'll post some pictures tomorrow, but hopefully it's just a software configuration challenge now.
Thanks for the tip regarding the 'big red dial', and also your info regarding the MQTT setup, as the dongle instructions don't go that far. They're great to use up to the Wifi manager configuration, but it was only from reading your info that I realised I needed to download an MQTT broker to get Home Assistant to find it.
I feel like I'm 80% of the way there currently. The question mark is whether the 20% remaining is done yet, and I'm just not seeing it, or whether there are some other setup bits required within MelPump.
130m2 4 bed detached house in West Yorkshire
10kW Mitsubishi Ecodan R290 Heat Pump - Installed June 2025
6.3kWp PV, 5kW Sunsynk Inverter, 3 x 5.3kWh Sunsynk Batteries
MyEnergi Zappi Charger for 1 EV (Ioniq5) and 1 PHEV (Outlander)
User of Havenwise (Full control Jun-Dec 2025, DHW only from early Dec)
Subscriber to MelPump App data via CN105 Dongle Kit
Update: I'm getting refreshed views of data showing me that the pump is functioning as expected, but they're showing up on the original MelCloud integration, not on the new MQTT one. It's probably something that I'll need to seek @f1p's guidance on, but that's a tomorrow problem.
For now, dongle installed and looks to be working fine. MelCloud data updating as normal, so the bridge element is also doing what's required. It's just a case of getting the account configured correctly in MelPump now.
130m2 4 bed detached house in West Yorkshire
10kW Mitsubishi Ecodan R290 Heat Pump - Installed June 2025
6.3kWp PV, 5kW Sunsynk Inverter, 3 x 5.3kWh Sunsynk Batteries
MyEnergi Zappi Charger for 1 EV (Ioniq5) and 1 PHEV (Outlander)
User of Havenwise (Full control Jun-Dec 2025, DHW only from early Dec)
Subscriber to MelPump App data via CN105 Dongle Kit
Posted by: @sheriff-fatman@majordennisbloodnok The dongle arrived today, and I've just completed the hardware setup successfully (got the green light on the dongle, etc).
...
All good news. Good to hear.
Posted by: @sheriff-fatman...
I can see figures in Home Assistant where the MQTT is now showing figures on the dashboard, but am currently waiting to see figures pull through into the Mel Pump app.
...
I've broken down your post into smaller chunks just so I understand in detail what you're saying. In this case, I'm assuming you now have a new MQTT device (Ecodan ASHP) in Home Assistant along with a whole army of associated entities, and that each of those entities (e.g. Flow Rate) are receiving values from the new little gizmo. Is that correct? If so, that's perfect.
As for the Melpump app, that's a separate thing for the moment and I'll deal with that later on.
Posted by: @sheriff-fatman...
I now have two separate integrations, as there was an existing MelCloud one, but the new MQTT device currently doesn't show any info.
...
OK, here I start getting a wee bit confused.
If you have two integrations (the Melcloud one and the MQTT one), they'll continue perfectly happily to act independently. I've kept my Melcloud integration running too, since it's a good way of verifying from a different route the settings on the heat pump. They'll coexist fine for as long as you want them to.
The problem getting me confused is that you've said the MQTT device isn't showing any info whilst earlier you said MQTT is showing figures on the dashboard. That appears to be contradictory so must mean we're talking at cross purposes. An explanatory screenshot or two would be very helpful here if you can manage it.
Posted by: @sheriff-fatman...
It's possible that this is because the heat pump is sitting idle currently, or that the device is using the imported MelCloud data for the remainder of today (nothing has updated within MelPump since 10:05pm, which is unusual, as it's normally a live view.
...
This is unlikely. The heat pump might be sitting idle but the CN105 doohickey isn't. It'll be constantly reading the heat pump's current state of affairs and sending messages to HA about it. What's more, the doohickey has no understanding of Melcloud at all, so it won't fill in any gaps from that; it'll only shout out whatever the heat pump tells it directly and if there's no info it'll shout out that there's no data available.
In addition, Melpump (the company's servers) will previously have been set to pull its data from Mitsi's servers (i.e. Melcloud) so if the Melpump configuration hasn't been changed that should still be the case and I've no idea why Melpump figures haven't updated. If, however, you have changed the Melpump configuration to tell it to expect data instead from the doohickey, that would make more sense, and if it isn't receiving that data then my guess is that there's a (simple to fix) issue with the secondary MQTT hostname, username and/or password settings in the doohickey's config page.
Posted by: @sheriff-fatman...
The location of the white box was a real challenge, particularly getting the top two screws off, but I succeeded eventually. I'll post some pictures tomorrow, but hopefully it's just a software configuration challenge now.
...
I can certainly sympathise and yes, pictures and explanations in your words will greatly help others following this path later. Good idea.
Posted by: @sheriff-fatman...
Thanks for the tip regarding the 'big red dial', and also your info regarding the MQTT setup, as the dongle instructions don't go that far. They're great to use up to the Wifi manager configuration, but it was only from reading your info that I realised I needed to download an MQTT broker to get Home Assistant to find it.
I feel like I'm 80% of the way there currently. The question mark is whether the 20% remaining is done yet, and I'm just not seeing it, or whether there are some other setup bits required within MelPump.
No problem on the tips and glad you've got to this point. Although it might seem like quite a steep learning curve, all the constituent parts are actually very straightforward and the biggest challenge is just familiarity.
I said earlier that I'd be saying a wee bit more about the Melpump app, and I think it's worth my breaking down into separate parts the different bits of communication going on here.
- There's one wire coming out of the CN105 socket on the FTC and that's the only way the heat pump can communicate anywhere.
- The wire goes to @f1p's doohickey and then on to the Mitsi wifi controller. Both these devices are acting independently of each other.
- The Mitsi wifi controller is the only way the heat pump can talk to Melcloud.
- The HA Melcloud integration only gets its data from the Melcloud API (Mitsi's servers)
- The doohickey has just one job to do and that's to send and receive MQTT messages. On one side, it communicates with the FTC. On the other side, it communicates with one or both the MQTT servers (brokers) in its configuration. Home Assistant is one, Melpump's server is the other (if yours is set up that way).
- Melpump's server is configured either to get its data from Melcloud or listen out for the doohickey. As far as I'm aware, it's not possible to configure it to do both.
- Melpump's app only talks with Melpump's server; any data you see there will have come from your heat pump and out to Melpump's server (either by MQTT or via Melcloud) before it's visible in the app.
With all those points in mind, it should become clearer that what you're seeing in Home Assistant is independent of what you're seeing in the Melpump app. Certainly, it's come from the same heat pump but the doohickey's conversation with Home Assistant is a separate one from its conversation with Melpump's server and also separate from the Mitsi wifi adapter's conversation with Melcloud.
I've listed all this in somewhat pedantic detail since if anything isn't working we should be able to zero in on the problem pretty quickly by seeing what's working and what's not; lots of moving parts that are each simple but potentially confusing if seen all together.
Posted by: @sheriff-fatmanUpdate: I'm getting refreshed views of data showing me that the pump is functioning as expected, but they're showing up on the original MelCloud integration, not on the new MQTT one.
OK, so if you're seeing data refreshed in the Melcloud integration then the Mitsi wifi adapter is working fine (also confirming the physical wires from CN105 are fine) and the HA Melcloud integration is still doing what it always did. All good.
105 m2 bungalow in South East England
Mitsubishi Ecodan 8.5 kW air source heat pump
18 x 360W solar panels
1 x 6 kW GroWatt battery and SPH5000 inverter
1 x Myenergi Zappi
1 x VW ID3
Raised beds for home-grown veg and chickens for eggs
"Semper in excretia; sumus solum profundum variat"
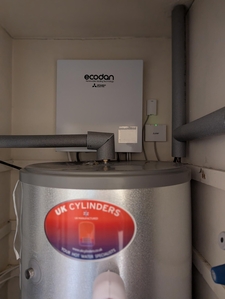
Hardware challenges first, for completeness. As noted previously, my white box is rather inconveniently located for this task, being behind the water cylinder in the airing cupboard, so the challenge of removing the 4 screws was one of reaching across while standing on a step and trying not to put weight on any pipework. This was after finding a Philips screwdriver short enough not to hit the ceiling for the two top screws.
It took a while to get done, as I was being very careful in leaning across, and the ballet positions weren't the most comfortable to maintain, but eventually the 4 screws were removed (the front two were easy, in fairness), and the panel could then be lifted off. The welcome sight of no flashing lights confirmed that all the power had been switched off via the big red dial at the heat pump.
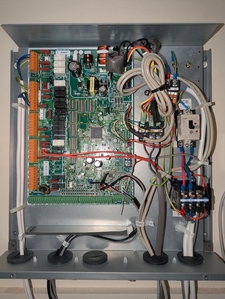
I took a photo of the layout before touching anything and was initially pleased at how neat it looked overall, before spotting one specific challenge in that the CN105 plug that I needed to remove had 4 wires coming from it, 2 of which were free hanging, and 2 of which (the yellow and green ones) were blocked behind another cable going into the socket above it.
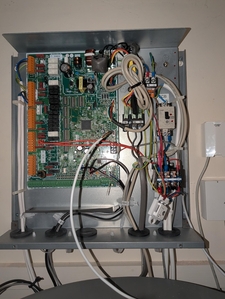
This ultimately constrained what I could do with the dongle, location wise, after doing the necessary bits to swap plugs around. I might return to it to see if I can use the magnet on the inside of the metal casing at the top, but for now it's hanging free, with the 2m of white cable stuffed into the bottom of the box. This photo was taken before I switched the power back on, and you can see the two changes needed. The red plug goes into the spare port on the white 'doohickey' (love that word, so will use it too!) and the white plug at the end of the white cable goes in the CN105 port that the other plug was removed from.
I kept everything open while I configured it, then switched off the power again to replace the cover. As expected, the LED was initially blue when power was restored, and ultimately green when I'd done the Home Assistant bits.
So all of that looks to be working as expected, and I doubt anyone following this will have a less convenient location to try to navigate, so I'd say that the requirement in normal circumstances of power off, remove 4 screws, swap over 2 ports, etc is straightforward enough.
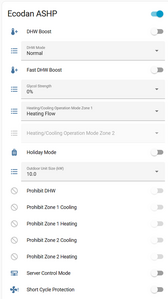
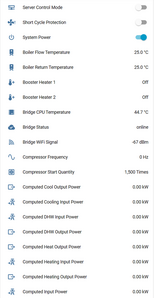
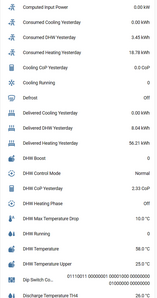
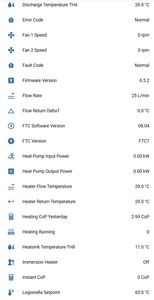
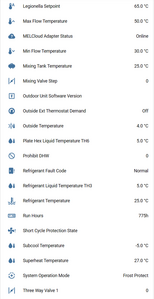
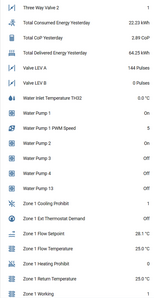
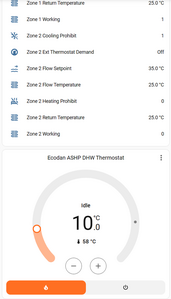
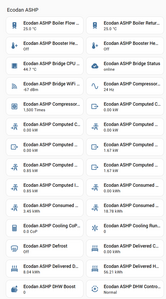
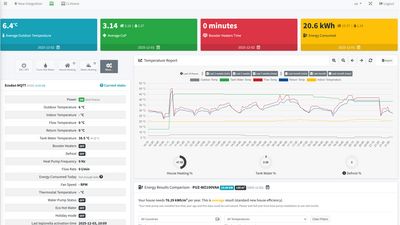
Now onto the software side of things. This needed reference to both the OP here and the instruction sheet with the dongle, but it seemed to work OK. In my default HA dashboard I now have a load of new data measurements showing (although I'm not sure if they're live reports or are from yesterday on a quick glance).
Did I mention that there were a lot of them? I've got more thermostat views showing too, in addition to the DHW one, but they're irrelevant for me as the system is under Havenwise control, hence the default DHW setting of 10°C showing here.
For some reason, trying to import the data into another dashboard was very limited, as only one of them was available (from memory, something to do with no views being available on several of them), but this is how the figures import into the one dashboard that I was able to add them to.
That looks to be a HA education issue for me as to how to get these things to work, so nothing to do with the query at hand, which relates to the Mel Pump setup.
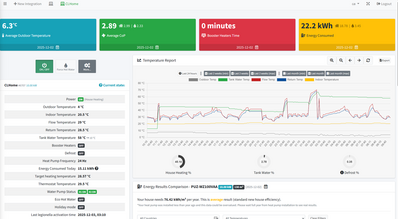
As of now, I have two integrations showing at the top of the screen - CLHome is the original MELCloud import and is continuing to report live data as before.
The MQTT one looks to be static data as at the point last night where it pulled in the history from the MELCloud integration. It isn't updating and the on/off button on it is greyed out. If I switch that to 'on' it goes back to the grey off display if I navigate away from that screen. I'm not sure how to get that one to start reporting, which is presumably a configuration issue.
I've left the Mel Pump system references showing deliberately in the screenshots, as these are currently two separate integrations (the second of which commenced a new trial period when set up yesterday). Once working, the intention is to ensure I have all the migrated data from the original one and only have one live account, but this is the point at which I'm stuck currently.
Any further insight welcomed. I suspect it's a setup issue somewhere, but isolating it appears to be beyond me currently.
130m2 4 bed detached house in West Yorkshire
10kW Mitsubishi Ecodan R290 Heat Pump - Installed June 2025
6.3kWp PV, 5kW Sunsynk Inverter, 3 x 5.3kWh Sunsynk Batteries
MyEnergi Zappi Charger for 1 EV (Ioniq5) and 1 PHEV (Outlander)
User of Havenwise (Full control Jun-Dec 2025, DHW only from early Dec)
Subscriber to MelPump App data via CN105 Dongle Kit
One other clue that I've just spotted is within the configuration section on Mel Pump. The working (MELCloud) one says it's running on FTC7 with software version 8.04. The equivalent screen in the new setup says its running on unknown with software version unknown, which again points to something not correct in the setup.
130m2 4 bed detached house in West Yorkshire
10kW Mitsubishi Ecodan R290 Heat Pump - Installed June 2025
6.3kWp PV, 5kW Sunsynk Inverter, 3 x 5.3kWh Sunsynk Batteries
MyEnergi Zappi Charger for 1 EV (Ioniq5) and 1 PHEV (Outlander)
User of Havenwise (Full control Jun-Dec 2025, DHW only from early Dec)
Subscriber to MelPump App data via CN105 Dongle Kit
Ah, OK. So that's rather enlightening.
Not having used Melpump myself, I wasn't aware that each link to a data feed (Melcloud or CN105 gizmo) is referred to as an "integration". Given that's exactly the same term used by Home Assistant, that's probably the key source of my confusion.
From what you've posted, that looks like proof positive that your new dongle is sending data to Home Assistant, so everything related to Melcloud and to Home Assistant can be crossed off the list (except for a bit of HA tidying which I'll come back to in a moment).
When I look at the billing page of Melpump, it says that integration with multiple heat pumps is not available for the trial and personal plans - only Advanced allows it. That might mean, in software terms, that 1 heat pump = 1 integration and that the same heat pump data from two sources (Melcloud and MQTT) might be seen as two heat pumps. I hasten to add that's a guess, but well worth giving Melpump support a shout since that's where they can earn their money. Nonetheless, if the dongle is sending MQTT to Home Assistant, it's a pretty safe bet it's doing fine doing the same to the Melpump servers, so I don't think there's any more dongle config to do unless we find out later that there was some typo in the Melpump server's details or the credentials to access it.
Coming back to Home Assistant, you're quite right that you're now firmly strapped into your seat and accelerating up the learning curve of HA dashboards. Thus far, you've added stuff to a dashboard by going to where all the entities are and clicking a link to chuck them all onto one dashboard. Now you've got comfortable with that, you're at the point where it's sensible to introduce you to two new things; adding things selectively to a dashboard and editing a dashboard. In other words, instead of going to your big bucket of entities and choosing where to dump the lot, you can go to where you want a bit of information and choose which entity(s) you want there - a selective pull rather than a bulk dump. Doing it that way round, you can not only just pick the bits that are useful to you (who really needs to regularly see what the FTC software version is?) but also which card to display it with so that it's most useful.
I suspect that next step in our conversation is probably better as a separate thread on Home Assistant manipulation, so for now I'll just wait until you say you have time and are happy to move your focus onto that bit. Until then, I'll let you focus on the Melpump integration bit. @F1P, is that something you're able to help with or is it a matter of talking directly with Melpump support?
105 m2 bungalow in South East England
Mitsubishi Ecodan 8.5 kW air source heat pump
18 x 360W solar panels
1 x 6 kW GroWatt battery and SPH5000 inverter
1 x Myenergi Zappi
1 x VW ID3
Raised beds for home-grown veg and chickens for eggs
"Semper in excretia; sumus solum profundum variat"
@majordennisbloodnok Thanks. That all makes logical sense to me. Also, I've noticed that the HA data is live, as I can now reference back to the earlier screenshots taken and see that some values have subsequently updated, including the frequency data as the pump has obviously started doing something now.
I'll ping an email to the Mel Pump support address, but I suspect you might be right in deducing that it might be a trial version limitation. I have no issue in starting the paid subscription early, as the trial version has already done its job in showing me that I wanted access to this data, but I'll need to figure out which one of the two that I should be activating.
Thanks for your input, once again.
130m2 4 bed detached house in West Yorkshire
10kW Mitsubishi Ecodan R290 Heat Pump - Installed June 2025
6.3kWp PV, 5kW Sunsynk Inverter, 3 x 5.3kWh Sunsynk Batteries
MyEnergi Zappi Charger for 1 EV (Ioniq5) and 1 PHEV (Outlander)
User of Havenwise (Full control Jun-Dec 2025, DHW only from early Dec)
Subscriber to MelPump App data via CN105 Dongle Kit
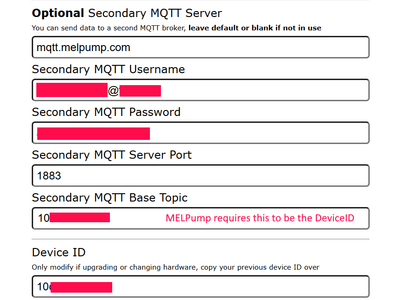
You have your Primary MQTT Server as Home Assistant which is good, I think what you are trying to acheive will require you to use the "Secondary" MQTT broker configured to send a copy of the same data to MELPump.
Ensure you have setup the MQTT integration on the MELPump side and set a password and then configure the Secondary MQTT Server in the adapter:
Regarding multiple heat pumps, i think you would likely migrate MELCloud integration currently to using the Adapter within MELPump full time (avoiding double subscription cost for less data & features)
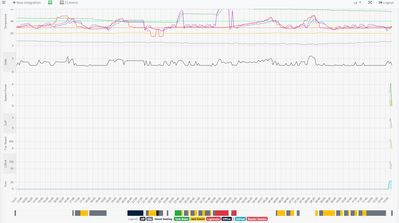
@f1p Thank you. I think that might have solved the problem. The MQTT server has now started pulling in data in the 5 minute view graphs and I'm seeing live figures in the dashboard for new statistics such as flow rate and fan speed.
I've just done a data migration from the MELCloud integration, which has filled the gap since 22:05 last night on this integration and, as the screenshot shows, there now looks to be new fields of data being reported over the last 15 minutes.
I wasn't quite sure which email and password combo I was supposed to use (i.e. Mel Pump login or something else) but it seems that I configured Mel Pump last night with a combination of my email address and the password I'd generated for the HA MQTT integration, so found the one that worked at the second attempt.
Thanks for steering me in the right direction, as I would have never have been able to find that fix without it.
I haven't heard back from Mel Pump support as yet, but the only thing left remaining now is to buy a paid subscription on the new integration account in due course, now that it looks to have pulled the MelCloud history into it, but it seems to be functioning now on the trial version for the time being.
Hopefully this thread will subsequently provide anyone else with the relevant steers they need to complete the entire process. I've certainly touched new ground doing this, being totally new to Home Assistant too, but had managed to get most of the way through the process before needing a nudge on the final part, so that should give hope to anyone considering it, and there's hopefully a decent amount of guidance for them to follow on every step of the process.
130m2 4 bed detached house in West Yorkshire
10kW Mitsubishi Ecodan R290 Heat Pump - Installed June 2025
6.3kWp PV, 5kW Sunsynk Inverter, 3 x 5.3kWh Sunsynk Batteries
MyEnergi Zappi Charger for 1 EV (Ioniq5) and 1 PHEV (Outlander)
User of Havenwise (Full control Jun-Dec 2025, DHW only from early Dec)
Subscriber to MelPump App data via CN105 Dongle Kit
- 27 Forums
- 2,495 Topics
- 57.8 K Posts
- 239 Online
- 6,220 Members
Join Us!
Worth Watching
Latest Posts
-
RE: Testing new controls/monitoring for Midea Clone ASHP
@cathoderay yes that is it in a nutshell. I am keepin...
By benson , 2 minutes ago
-

@painter26 — as @jamespa says, it's for filling and re-...
By cathodeRay , 49 minutes ago
-
RE: Humidity, or lack thereof... is my heat pump making rooms drier?
I'd be happy with what you have (so would millions of o...
By Deltona , 2 hours ago
-
RE: Oversized 10.5kW Grant Aerona Heat Pump on Microbore Pipes and Undersized Rads
@uknick TBH if I were taking the floor up ...
By JamesPa , 11 hours ago
-
RE: What determines the SOC of a battery?
@batpred Your BMS parameters will be the same as m...
By Bash , 12 hours ago
-

RE: Getting ready for export with a BESS
I would have not got it if it was that tight
By Batpred , 13 hours ago
-

RE: Setback savings - fact or fiction?
I also need to correct something I said by mistake earl...
By cathodeRay , 13 hours ago
-

RE: Electricity price predictions
@judith Thanks for sharing, and nice to see how the ...
By Batpred , 14 hours ago
-
RE: Need help maximising COP of 3.5kW Valiant Aerotherm heat pump
@judith thanks Judith. Confirmation appreciated. The ...
By DavidB , 16 hours ago
-

RE: Recommended home battery inverters + regulatory matters - help requested
That makes sense. I thought better to comment in this t...
By Batpred , 17 hours ago
-
Bosch CS5800i 7kW replacing Greenstar Junior 28i
My heat pump journey began a couple of years ago when I...
By Slartibartfast , 17 hours ago
-

RE: How to control DHW with Honeywell EvoHome on Trianco ActiveAir 5 kW ASHP
The last photo is defrost for sure (or cooling, but pre...
By JamesPa , 19 hours ago
-

RE: Plug and play solar. Thoughts?
Essentially, this just needed legislation. In Germany t...
By Batpred , 19 hours ago
-
RE: A Smarter Smart Controller from Homely?
@toodles Intentional opening of any warranty “can of wo...
By Papahuhu , 20 hours ago
-
RE: Safety update; RCBOs supplying inverters or storage batteries
Thanks @transparent Thankyou for your advic...
By Bash , 22 hours ago
-
RE: Air source heat pump roll call – what heat pump brand and model do you have?
Forum Handle: Odd_LionManufacturer: SamsungModel: Samsu...
By Odd_Lion , 22 hours ago
-
RE: Configuring third party dongle for Ecodan local control
Well, it was mentioned before in the early pos...
By F1p , 2 days ago
-

RE: DIY solar upgrade - Considering adding more panels
I know this is a bit old, but it made me wonder what co...
By Batpred , 2 days ago
-

RE: New Vaillant aroTherm Plus in black - When will it come to the UK?
@majordennisbloodnok Daikin, take note! (In fact, I hav...
By Toodles , 2 days ago
-

RE: Midea ASHP – how to set weather compensation
@mk4 — good work! First, I agree, no evidence of cycl...
By cathodeRay , 2 days ago
-

RE: Solis inverters S6-EH1P: pros and cons and battery options
I don't know about Solis inverters. It isn't a featur...
By Transparent , 2 days ago
-
Daikin Altherma 3 H HT - Freeze Prevention Threshold
Hi. We have an Altherma 3 HT (18kW I think) which, now ...
By RICHARDF5033 , 2 days ago
-
RE: Passiv Smart Thermostat - Help & Forum Support
@petch We are not yet compatible with the R290 from Gra...
By Will H , 2 days ago

