Posted by: @cosminI am also attaching the log, maybe one of you can point me in the right direction.
Looking at the esphome code. The code uses call backs and once a response is received the request is removed from the queue. Some possible causes are #1 you have duplicated entries in your config (I don't know if unique registers are enforced by esphome] #2 the mim module is not responding to the requests.
I see a lot of timeouts in your error log suggesting cause #2 above, make sure you have properly terminated your cable etc.
I would setup your esphome config to look at only one register. Pick a register that does not require the additional programing of the MIM-19 board to remove that as a variable.
Compare your esphome config with that of @steven's setup he posted on github
If all that fails, connect to your PC. I first got mine working from the command line on my Laptop, before connecting to HA.
@cyrusir if you use an ESP as the modbus master, the ESP is the only thing that has to be wired to the MIM module. the comms from the ESP to your HA machine can be over Wifi or wired LAN - any IP network - so wiring all the way back to the HA machine is not a requirement.
The ESP can even potentially go inside the casing of the outdoor unit i.e. right next to the MIM-19, take 12V from the MIM's supply.
My octopus signup link https://share.octopus.energy/ebony-deer-230
210m2 house, Samsung 16kw Gen6 ASHP Self installed: Single circulation loop , PWM modulating pump.
My public ASHP stats: https://heatpumpmonitor.org/system/view?id=45
11.9kWp of PV
41kWh of Battery storage (3x Powerwall 2)
2x BEVs
@william1066 I have tried every recommandation and nothing changed. I used also a modbus bridge hooked to my computer and no succes. I've ordered another MIM to test. Thanks.
For those of you doing this in 2024 for interfacing with home assistant there's no longer the need for the outdoor modbus module. You can just use an esp with a modbus interface directly with the unit over Samsungs NASA protocol using this.
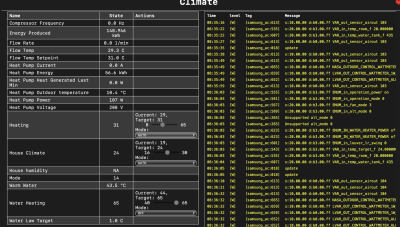
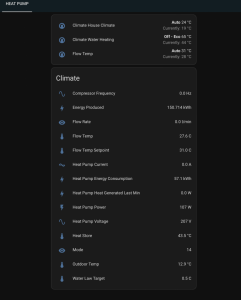
Here's my ESPhome yaml for these sensors.
# This example provides a basic configuration and description based on the M5STACK components
# For further configuration you should visit the ESPHome docs  https://esphome.io
# Every line starting with a # can be removed.

## BASIC CONFIGURATION
esphome:
  name: samsung-ac
  friendly_name: Climate

# Select chipset and board configuration - in this case M5STACK
esp32:
  board: m5stack-atom

# [Optional] - Create web interface where you can control the AC from your web browser (without Home Assistant)
web_server:
  port: 80

# Enable logging
logger:
  level: INFO
  logs:
    component: ERROR # Remove the "Your component takes to long to respond warning"


# Enable native API for communication with Home Assistant, this can be removed if you do not plan to use it with Home Assistant
api:

# Enable OTA firmware update, you will be able to upload the firmware over WiFi without connecting the device by cables
ota:

# Setup your WiFi password
wifi:
  ssid: "Pig Net 2000" # !!!CHANGE ME!!!
  password: "iamwireless" # !!!CHANGE ME!!!
  use_address: 192.168.1.130

captive_portal:

# Specify pins used by the board to comunicate with RS485 board - in this case M5STACK
uart:
  tx_pin: GPIO26
  rx_pin: GPIO32
  # For older devices it could also be 2400. But you should start with 9600.
  baud_rate: 9600
  parity: EVEN
  debug:
    direction: BOTH
    dummy_receiver: false
    after:
      delimiter: "\n"
    sequence:
      - lambda: UARTDebug::log_string(direction, bytes);


## SAMSUNG AC CONFIGURATION

# Import custom component from GitHub
external_components:
  - source: github://daaaaan/esphome_samsung_ac@dans # use @main if you want the latest development (possibly unstable?)
    components: [samsung_ac]

# Configuration of AC component
samsung_ac:

  # Capabilities configure the features alle devices of your AC system have (all parts of this section are optional).
  # All capabilities are off by default, you need to enable only those your devices have.
  # You can override or configure them also on a per devices basis (look below for that).
  # capabilities:
  #   vertical_swing: true
  #   horizontal_swing: true
  #   # Presets define special AC modes like Windfree and so on.
  #   # The following modes are available: sleep, quiet, fast, longreach, windfree
  #   presets:
  #     # short version
  #     quiet: true
  #     # long version - allows to locilize names
  #     quiet:
  #       name: "Makes no sound"
  #       enabled: true

  devices:
      # Repeat everything below for each indoor device address you see in your logs
    - address: "10.00.00"
      outdoor_temperature:
        name: Heat Pump Outdoor temperature
      custom_sensor:
        - name: Heat Pump Voltage
          message: 0x24fc
          device_class: voltage
          state_class: measurement
          unit_of_measurement: V
        - name: Heat Pump Current
          message: 0x8217
          device_class: current
          state_class: measurement
          unit_of_measurement: A
          accuracy_decimals: 1
          filters:
            - multiply: 0.1
        - name: Heat Pump Power
          message: 0x8413
          device_class: power
          state_class: measurement
          unit_of_measurement: W
        - name: Heat Pump Energy
          message: 0x8414
          device_class: energy
          state_class: total_increasing
          unit_of_measurement: kWh
          accuracy_decimals: 1
          filters:
            - multiply: 0.001
        - name: Compressor Frequency
          message: 0x8238
          device_class: frequency
          state_class: measurement
          unit_of_measurement: Hz
          accuracy_decimals: 1
          # filters:
          #   - multiply: 0.1


    - address: "20.00.00" # Indoor device address
      # Each property below is optional (climate, room_temperature etc.) - you can delete those which you dont need.
      # For the names we suggest to choose a combination of room name and the thing it controls.
      energy_produced: # Indoor
        name: "Energy Produced"
      water_temperature:
        name: "Warm Water"
      # Configures/overrides the capabilites for this devices.
      # Look above for all options.
      capabilities:
        horizontal_swing: false # This device have no h swing.

      # Creates climate control in Home Assistant. A climate control combines multiple of the controls below (like temperature, mode etc.)
      climate:
        name: "House Climate"

      # The controls directly below are all included in the climate control. Its adviced to only add the climate control and skip the extra controls.
      # room_temperature:
      #   name: "House temperature"
      # target_temperature:
      #   name: "House target temperature"
      # power:
      #   name: "House power"
      # mode:
      #   name: "House mode"

      # If your AC sits near or inside the ceiling, the reported room temperature is often a little bit heigher then whats
      # measured below. This property can be used to correct that value.
      room_temperature_offset: -1.4

      # Only supported on NASA devices
      room_humidity:
        name: "House humidity"

      # custom climate allow to define custom addresses and behaviour for many climate components
      # Addresses are more or less described on the file xlxs (link)
      # enabling debug_log_messages: true under the samsung_ac section, you can look at sent data directly from ESP web loger.
      # Most of temperatura are in celsius with a /10 formula.
      custom_climate:
        - name: "Water Heating"
          status_addr: 0x4237 # mandatory address regarding status temperature
          set_addr: 0x4235    # mandatory address regarding setpoint temperature
          set_min: 40         # optional, default = 25°C
          set_max: 65         # optional, default = 65°C
          enable_addr: 0x4065 # mandatory enabling address, only 1/0 should be written there. Look at mode sub section
                              # By default the value is set = 1 when HA send a value > 0.
          preset:
            addr: 0x4066      # Address for presets
            ClimatePreset0Value: 1 # CLIMATE_PRESET_NONE => 1 Standard
            ClimatePreset1Value: -1 # CLIMATE_PRESET_HOME
            ClimatePreset2Value: -1 # CLIMATE_PRESET_AWAY
            ClimatePreset3Value: 2 # CLIMATE_PRESET_BOOST => 2 Power
            ClimatePreset4Value: -1 # CLIMATE_PRESET_COMFORT
            ClimatePreset5Value: 0 # CLIMATE_PRESET_ECO => 0 Eco
            ClimatePreset6Value: -1 # CLIMATE_PRESET_SLEEP
            ClimatePreset7Value: 3 # CLIMATE_PRESET_ACTIVITY  => 3 Force
        - name: "Heating"
          status_addr: 0x4238
          set_addr: 0x4247
          set_min: 8          # large enough to let both ranges for heating (25-65)°C and cooling (8-25)°C
          set_max: 65
          enable_addr: 0x4000
          mode:
            addr: 0x4001      # In this case the single ClimateMode is splitted between the enable_addr and the mode->addr
                              #  https://esphome.io/api/namespaceesphome_1_1climate#a8716cd7ed01ceb7ccedfa2f7b47a39d2
                              # As before, the enable_addr is set = 1 for each mode > 0. If a value of enable is read = 0 from nasa,
                              # a value of CLIMATE_MODE_OFF is sent to HA regardless of the value of the register mode->addr
            #ClimateMode0Value:  # Default -1 = CLIMATE_MODE_OFF is not translated into mode->addr
            #ClimateMode1Value:  # Default -1 = CLIMATE_MODE_HEAT_COOL is not translated into mode->addr
            ClimateMode2Value: 1 # Default -1. Setting =1 the value CLIMATE_MODE_COOL==2 is translated as 1 into mode->addr
            ClimateMode3Value: 4 # Default -1. Setting = 4 the value CLIMATE_MODE_HEAT==3 is translated as 4 into mode->addr
            #ClimateMode4Value: -1
            #ClimateMode5Value: -1
            ClimateMode6Value: 0 # Default -1. Setting = 4 the value CLIMATE_MODE_AUTO==6 is translated as 0 into mode->addr

      custom_sensor:
        - name: Flow Temp
          message: 0x4238
          device_class: temperature
          state_class: measurement
          unit_of_measurement: C
          accuracy_decimals: 1
          filters:
            - multiply: 0.1
        - name: Heat Pump Heat Generated Last Min
          message: 0x4426
          device_class: energy
          state_class: measurement
          unit_of_measurement: W
          accuracy_decimals: 1
          filters:
            - multiply: 0.1
        - name: Flow Rate
          message: 0x42E9
          device_class: volume_flow_rate
          state_class: measurement
          unit_of_measurement: l/min
          accuracy_decimals: 1
          filters:
            - multiply: 0.1
        - name: Flow Temp Setpoint
          message: 0x4247
          device_class: temperature
          state_class: measurement
          unit_of_measurement: C
          accuracy_decimals: 1
          filters:
            - multiply: 0.1
        - name: Water Law Target
          message: 0x4248
          device_class: temperature
          state_class: measurement
          unit_of_measurement: C
          accuracy_decimals: 1
          filters:
            - multiply: 0.1
        - name: Mode
          message: 0x4002
          state_class: measurement
Hi @morh. Excellent find, thank you for sharing.
I was about to start looking at how to route a signal cable to my external unit before buying a Modbus module but this sounds like the simpler and cheaper way to go instead.
No problem, the only slight caveat I would say with my example above is that it's currently waiting in a PR on gihub from another user to get the climate entities in HA. Thats why I've forked then merged it myself so the part below is pointed to my GitHub where as for future support is most likely better just to use the main branch repository as as soon as the PR is in the owners codebase I'll move mine across.
external_components:
  - source: github://daaaaan/esphome_samsung_ac@dans # use @main if you want the latest development (possibly unstable?)
    components: [samsung_ac]
For future reference this would need to be the block below instead but currently it doesn't have support for the custom climate entities.
# Import custom component from GitHub
external_components:
  - source: github://lanwin/esphome_samsung_ac@stable # use @main if you want the latest development (possibly unstable?)
    components: [samsung_ac]
@morh Your post was music to my ears!
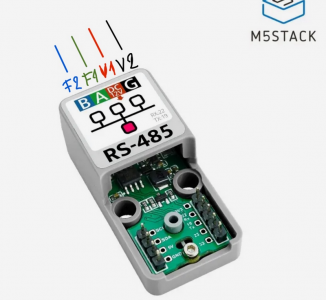
I am getting a Gen 7 Samsung Monobloc installed in a couple of weeks time and was going to order the MIM-B19 Card to combine with an ESP32 into Home Assistant. Thank you for the code, but do you have any more information of how you wire the ESP32 without a Mim modbus card? Do you just connect the ESP to one of these.
and then connect A & B terminal directly into the heat pump?
Many thanks
@elgreco69 worth reading the GitHub here as that will answer all your questions, I'd suggest using the esp board they use.
https://github.com/lanwin/esphome_samsung_ac
The GitHub link was edited by a mod in my first post previously and isn't very obvious... 😀
Many thanks. So I connected the M5Stack based sensor to the heat pump, and the dashboard and data work fine… but when I change the setting from the dashboard, they don’t change on the wired control pad. I also have the Samsung wifi module connected (wifi 2.0) so i am not sure if that is interfering. Any suggestions?
I have added a picture of the log in case it helps.
Thanjs a lot for the help!
sorry for the delayed response.
I’m not sure to be honest, I can’t seem to see an attachment but maybe you’ve sorted it by now anyway!
Posted by: @elgreco69So I connected the M5Stack based sensor to the heat pump, and the dashboard and data work fine… but when I change the setting from the dashboard, they don’t change on the wired control pad.
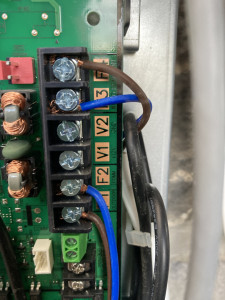
@elgreco69 @morh Can you help me with the wiring please? The descriptions that I have seen are for Samsung HVACs rather than heat pumps, so I just wanted to confirm that I have understood it correctly.
- Do you connect F3 on the Samsung board to terminal A on the M5STACK RS-485 base and F4 to terminal B?
- Does it matter that these terminals are already used for wiring the remote wired controller?
- Do you connect V1 and V2 to the RS-485 base as in the diagram?
- If so, would screened 1mm2 4 core cable be the correct one to use?
Many thanks.
- 27 Forums
- 2,495 Topics
- 57.8 K Posts
- 297 Online
- 6,220 Members
Join Us!
Worth Watching
Latest Posts
-

RE: Electricity price predictions
Government strategy is for heat networks to provide 20%...
By Transparent , 35 minutes ago
-
-
RE: Rate the quality of your heat pump design and installation
When I saw the world flawless that immediately to me me...
By Bash , 40 minutes ago
-
RE: Knock on effective of balancing radiators
Thanks @jamespa Yes, I'd be leaving several radiator...
By Bash , 60 minutes ago
-

Thanks for confirming. I should have suspected "C16" (i...
By Batpred , 1 hour ago
-
RE: Our Experience installing a heat pump into a Grade 2 Listed stone house
The years between oil use and the heat pump (roughly 20...
By cathodeRay , 1 hour ago
-
RE: RDSAP10 effect on existing heat pump EPC rating?
@af1 My EPC rating jumped from E to C after installatio...
By dr_dongle , 2 hours ago
-

RE: Homely setup on daikin heat pump
Hello fellow Daikin owner, my installer retro-fitted my...
By Toodles , 2 hours ago
-
RE: A Smarter Smart Controller from Homely?
@odd_lion the minimum MCS requirement is 2.8. I don't...
By benson , 3 hours ago
-
RE: Advice on potential HW Cylinder size
I think the comment about heating from cold is quicker ...
By sjcsystems , 12 hours ago
-

RE: Ideal HP290 14kW ASHP - how to optimise
Hi You can get a stethoscope for less than 10€ on Ama...
By bobflux , 12 hours ago
-
@editor Hi Mars Just reading the ultimate heatpump...
By Travellingwave , 15 hours ago
-
RE: Testing new controls/monitoring for Midea Clone ASHP
@tasos as above the pump is always running... Thanks ...
By benson , 15 hours ago
-
RE: Struggling to get CoP above 3 with 6 kw Ecodan ASHP
Your DT is to low, you do not have enough heat exchange...
By ASHP-BOBBA , 16 hours ago
-

RE: What determines the SOC of a battery?
I am aware. But is your chart direct from a Pace BMS ap...
By Batpred , 16 hours ago
-
RE: Call for heat on open loop weather comp system
I don't know Grant system but most ASHP are very simila...
By ASHP-BOBBA , 16 hours ago
-

@painter26 — good idea. Please do let us know what he s...
By cathodeRay , 17 hours ago
-

RE: Setback savings - fact or fiction?
@robs — thank you for your as ever valuable comments. T...
By cathodeRay , 18 hours ago
-

RE: Solis inverters S6-EH1P: pros and cons and battery options
Yes, but I need to reopen the battery box.. I just noti...
By Batpred , 22 hours ago
-

RE: The Hidden Secret to a Successful Heat Pump: Pipe Size Matters
If your heat loss is only 4kW and the pipes leaving the...
By JamesPa , 1 day ago
-
RE: Humidity, or lack thereof... is my heat pump making rooms drier?
My 2 bed mid-terrace definitely dropped consistently af...
By RadWhisperer , 1 day ago
-
RE: Peak Energy Products V therm 16kW unit heat pump not reaching flow temperature
With complete radio silence from Peak and no sign of th...
By DaveC , 2 days ago
-

No you arent, because you dont need any, and furthermor...
By JamesPa , 2 days ago

