Shelving options for LF280K batteries
Posted by: @transparentI'm somewhat struggling to picture these shelves with your dimensions @chickenbig
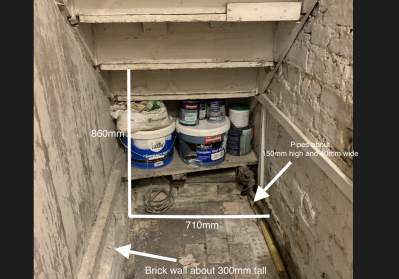
Yep, sorry for wasting your time with the uninformative photographs and description. Hopefully the following photo shows what I have to work with under the stairs. The exit is just to the left of where the camera is.
The pipes at the right (unused gas pipe at the bottom, then still-in-service electricity cable above it) form a bit of a barrier either to a pole or fixing into the wall, measuring about 150mm high and 40mm in width. The obstruction width could be reduced by about 20mm were the gas pipe to be removed, and the obstruction height might also be reduced by a similar amount, if the electrical cable has any flex left...
The wall on the left is about 300mm of brick followed by a non-load-bearing tongue & groove wooden wall.
I think it makes most sense from a build and maintenance perspective to have the cells lined up horizontally (terminals pointing towards where the camera is). So this rather constrains the solutions. Double stacking will be required, given the height of the cells alone (around 700mm).
Posted by: @transparent27mm pipe sounds overkill to me.
Indeed, I'm starting from what I know (buying a kit of parts) towards a more custom solution one step at a time. I'm now comfortable with the key clamp system, so should give Unistrut another look.
Posted by: @transparentAlthough I will soon have 40kWh of storage here, the nature of the experimental trials I'm doing means that these are always used within the 20-80% capacity range.
The full capacity of the battery was really around reducing on-peak grid requirements on cold winter days when the heat pump is (eventually, hopefully) installed; it will enable using mostly stored Economy 7 electricity through the day. Targeting Economy 7 also means the charge current will be at most 80A (28000Wh/7h/50V), lessening the stress on the cells.
That's a very helpful photo @chickenbig - thank you.
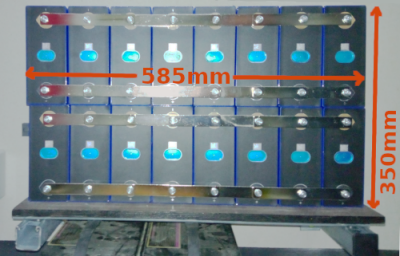
Here's the dimensions of a battery in the relevant orientation with no spacers between cells in either direction:
The Buffalo Board below the cells is 12mm, because that's what I happened to have. It's also available in 6.5mm and 9mm.
Incidentally if you fancy 'stress-testing' your cells, place them as shown and then check the dimensions with a steel tape 😲
Alternatively, measuring the distance between terminals with metallic vernier calipers works equally well !
@chickenbig are you intending to place the bottom row of cells on a board immediately above the brick floor rather than on a shelf supported by uprights?
I was initially looking to 'save space' by using the 300mm high brick wall on the left to support two of the uprights.
But if you made these from standard 41mm square Unistrut, then the whole shebang can sit directing onto the brick floor.
Since the design uses slots rather than holes, you may not even need to level the bottoms of the uprights with 'chocks'.
Depending on how you cut, there may be sufficient adjustment available to ignore the uneven floor.
Save energy... recycle electrons!
Posted by: @transparentcheck the dimensions with a steel tape
I believe "carefully" is the word of the day. I stacked 16 of my batteries up in that pattern and came to about the same measurements. This gives me 125mm width to play with (or 105mm if the old gas pipe gets removed), so I think placing vertical supports directly onto the brick floor is possible.
Things I noted while stacking them up;
- They are heavy and bulky, so are difficult to move around with one hand. This means tighter spacing of the rows will create accessibility issues (i.e. sliding one side over another may cause nicks in the insulating covering.
- Although the cells felt fairly stable when stacked side on, it did emphasise to me the importance of having a very flat and level base, and I'd feel better with end-stops to prevent excessive lateral movement, especially during assembly.
- I felt rather nervous of the (exposed) terminal ends, so was handling the tape measure very cautiously and never putting them on the face with the terminals.
- I don't think putting it on a piece of carpet helped out the accuracy of measurements or the stability of the cells!
Posted by: @transparentare you intending to place the bottom row of cells on a board immediately above the brick floor rather than on a shelf supported by uprights?
Now that you mention it, the possibility of resting the shelf on the brick floor is a good use of space! I'd have to put a damp-proof course of plastic and perhaps a plinth of cement to get a nice and level surface, and I'd need to be careful of chilling the cells (since the floor is pretty cold most of the time). But this would save a good deal of vertical space; allowing 20mm for the concrete and 10mm for boards I think there is about 70mm of vertical wiggle-room. 35mm per row does not sound much, so getting the upper level of cells in each grouping will be a bit tricky!
Revisiting this thread, I'm taking a different route with inverter and battery location. Instead of under the stairs I've identified another location (behind a door, so out of sight) that affords better access as well as being better for inverter ventilation. This does mean some awkward cable runs (CT clamp, mains and possible ethernet) through the kitchen, but it is a better situation and keeps the under-stairs cupboard useful as a storage room for bits and bobs.
- 27 Forums
- 2,495 Topics
- 57.8 K Posts
- 259 Online
- 6,220 Members
Join Us!
Worth Watching
Latest Posts
-
RE: Setback savings - fact or fiction?
@cathoderay The input power is largely determined by...
By RobS , 30 minutes ago
-

RE: Humidity, or lack thereof... is my heat pump making rooms drier?
@editor, this is now an example of greenwashing in the ...
By Majordennisbloodnok , 41 minutes ago
-

RE: Electricity price predictions
@transparent Im impressed by all your work on this. ...
By JamesPa , 2 hours ago
-

RE: Solis inverters S6-EH1P: pros and cons and battery options
Just to wrap this up here for future readers: The S...
By Batpred , 2 hours ago
-
RE: Struggling to get CoP above 3 with 6 kw Ecodan ASHP
Welcome to the forums.I assume that you're getting the ...
By Sheriff Fatman , 3 hours ago
-

RE: What determines the SOC of a battery?
I agree. Fogstar confirmed that the Seplos BMS does ...
By Batpred , 3 hours ago
-
RE: Say hello and introduce yourself
@editor @kev1964-irl This discussion might be best had ...
By GC61 , 4 hours ago
-

RE: Testing new controls/monitoring for Midea Clone ASHP
@benson — as @tasos suggests, plotting multiple variabl...
By cathodeRay , 6 hours ago
-

@painter26 — as @jamespa says, it's for filling and re-...
By cathodeRay , 8 hours ago
-

RE: Oversized 10.5kW Grant Aerona Heat Pump on Microbore Pipes and Undersized Rads
@uknick TBH if I were taking the floor up ...
By JamesPa , 19 hours ago
-

RE: Getting ready for export with a BESS
I would have not got it if it was that tight
By Batpred , 20 hours ago
-
RE: Need help maximising COP of 3.5kW Valiant Aerotherm heat pump
@judith thanks Judith. Confirmation appreciated. The ...
By DavidB , 24 hours ago
-

RE: Recommended home battery inverters + regulatory matters - help requested
That makes sense. I thought better to comment in this t...
By Batpred , 24 hours ago
-
Bosch CS5800i 7kW replacing Greenstar Junior 28i
My heat pump journey began a couple of years ago when I...
By Slartibartfast , 1 day ago
-

RE: How to control DHW with Honeywell EvoHome on Trianco ActiveAir 5 kW ASHP
The last photo is defrost for sure (or cooling, but pre...
By JamesPa , 1 day ago
-

RE: Plug and play solar. Thoughts?
Essentially, this just needed legislation. In Germany t...
By Batpred , 1 day ago
-
RE: A Smarter Smart Controller from Homely?
@toodles Intentional opening of any warranty “can of wo...
By Papahuhu , 1 day ago
-
RE: Safety update; RCBOs supplying inverters or storage batteries
Thanks @transparent Thankyou for your advic...
By Bash , 1 day ago
-
RE: Air source heat pump roll call – what heat pump brand and model do you have?
Forum Handle: Odd_LionManufacturer: SamsungModel: Samsu...
By Odd_Lion , 1 day ago
-
RE: Configuring third party dongle for Ecodan local control
Well, it was mentioned before in the early pos...
By F1p , 2 days ago
-

RE: DIY solar upgrade - Considering adding more panels
I know this is a bit old, but it made me wonder what co...
By Batpred , 2 days ago
-

RE: New Vaillant aroTherm Plus in black - When will it come to the UK?
@majordennisbloodnok Daikin, take note! (In fact, I hav...
By Toodles , 2 days ago
-

RE: Midea ASHP – how to set weather compensation
@mk4 — good work! First, I agree, no evidence of cycl...
By cathodeRay , 2 days ago


