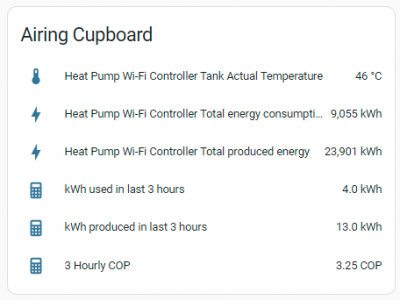
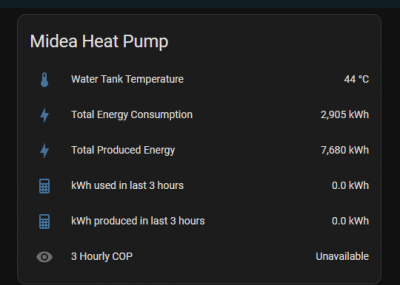
@tried2fail - Perhaps I should also add that the entities prefixed with 'Heat Pump Wi-Fi Controller...' come from the python module, while the bottom 3 in my dashboard card are calculated using the statistics and template code in my configuration.yaml file:
Midea 14kW (for now...) ASHP heating both building and DHW
@cathoderay You were right - just need to wait a couple more hours now for your custom calculations to start showing data. Good stuff!
@tried2fail - good to hear it is working. Note I changed the line of code that does the produced/used division a few times, trying to get it to stop producing results to an absurd number of decimal places. the current version (integer division = integer result => string => take the first four chars of the string) seems to be the most reliable way of doing it. The | character is a pipe, it feeds the result of its left hand side to its right hand side, the [0:4] gets four chars, starting at position zero (python string counting is zero based) and stopping at position 4 (can be a bit confusing: it stops at position 4, so the last char returned is in position 3: thus 3.66666666666[0:4] (with 3.66666666666 as a string not a number, slicing as it called only works on strings) yields 3.66. The 0 is optional (default is 0 but I kept it to remind me it is zero based counting). The code is:
{{ ((int(produced)/int(used)) | string )[0:4] }}
Midea 14kW (for now...) ASHP heating both building and DHW
@batalto - I'm guessing chat gpt means https://chat.openai.com/auth/login - always engaged (as hopefully you can see from the link padding).
@derek-m - here's a crucial bit of code that gets the total energy consumption / total produced energy. As is often the way, the classes aren't in human logical order, but what seems to happen is the second class checks the type of message, and if it is one type it calls another class/function (C3MessageBody, which I haven't copied here, it deals with the 03/01 type messages that have the DHW temps etc), but if it is "MessageType.notify1 and self._body_type == 0x04" then it calls the first class, C3Notify1MessageBody, which then processes the string to get the data (this snippet also has my testvars in it):
class C3Notify1MessageBody(MessageBody):
    def __init__(self, body, data_offset=0):
        super().__init__(body)
        status_byte = body[data_offset]
        self.status_tbh = bool(status_byte & 0x08)
        self.status_dhw = bool(status_byte & 0x04)
        self.status_ibh = bool(status_byte & 0x02)
        self.status_heating = bool(status_byte & 0x01)

        self.total_energy_consumption = (
            (body[data_offset + 1] << 32) +
            (body[data_offset + 2] << 16) +
            (body[data_offset + 3] << 8) +
            (body[data_offset + 4]))

        self.total_produced_energy = (
            (body[data_offset + 5] << 32) +
            (body[data_offset + 6] << 16) +
            (body[data_offset + 7] << 8) +
            (body[data_offset + 8]))

        self.testvar1 = body[data_offset + 12]
        self.testvar2 = body[data_offset + 13]


class MessageC3Response(MessageResponse):
    def __init__(self, message):
        super().__init__(message)
        body = message[self.HEADER_LENGTH: -1]
        if (self._message_type in [MessageType.notify1, MessageType.query] and self._body_type == 0x01) or \
                self._message_type == MessageType.notify2:
            self._body = C3MessageBody(body, data_offset=1)
        elif self._message_type == MessageType.notify1 and self._body_type == 0x04:
            self._body = C3Notify1MessageBody(body, data_offset=1)
        self.set_attr()
Now, I know where C3 comes from, it's the device type (heat pump), and self._body_type == 0x04 makes sense, this message is an 04/04 message with "'body type': '04'" in it, but how did the developer know about MessageType.notify1, how did he/she know they needed to add a C3Notify1Message class to the code, and even more pertinently, how did he/she know not only where the relevant data was, the data_offsets, and what bitwise operations to do? I have noticed the reverse 8/16/32 sequence, is that somehow because it is binary data, each chunk is one further up the binary scale, so a 1 in position four (1000) is decimal 8 so to convert the binary to decimal you multiply by eight, a one in position 5 is decimal 16 so you multiply by 16 and so (and it there is a zero in the position, it just evaluates to zero), and then you just add them all together to get decimal equivalent of a binary number. But the problem here is this is if you like binary maths, but the message string looks like it is a hex string, and there is no obvious binary to hex conversion that I can see.
How did the developer know where to look? I'm growing increasingly persuaded they have inside information.
I've just had a thought: what happens if I add another foursome for offsets 9 10 11 and 12, with the same maths:
        self.total_mystery1 = (
            (body[data_offset + 9] << 32) +
            (body[data_offset + 10] << 16) +
            (body[data_offset + 11] << 8) +
            (body[data_offset + 12]))
Will try this, and report back! Meanwhile, if you have any insights into what is going on, I would be very interested to hear them.
Midea 14kW (for now...) ASHP heating both building and DHW
As you have probably noticed, I have been busy answering queries from new forum members, though I have been giving some thought to your adventure into the World of Data Acquisition.
For industrial systems to acquire and store large amounts of data it has to be done in a structured manner, otherwise the proverbial 'excrement' would hit the proverbial 'fan'.
As discussed previously, Boolean data is stored in bit format, within bytes or words. Integers would be allocated sufficient bytes to store the largest anticipated number, as would real numbers to a fixed precision or floating point.
I have not fully deciphered the 'messages' yet, but I suspect that they may consist of the following:-
The first byte or two possibly identifies the message type. So that the sending computer knows how to assemble the message and the receiving computer knows how to read the message.
The next number of bytes appear to contain boolean information.
The remaining bytes appear to contain integers or fixed precision numbers, with the byte count depending upon the maximum anticipated value, so that if the value is expected to be within the range -127 to +127 then only 1 byte is used. For larger numbers, 2 or even 4 bytes are being used, which makes the deciphering a little more interesting.
There may also be a Cyclic Redundancy Check also added to the message.
@tried2fail and @batalto (and anyone else who is using or may use the kWh/COP stats) - as you know this is still work in progress, a polite way of saying it could all be a load of bollox. The definitive version will go in the Beginner's Guide thread when it is ready, but in the meantime, I have tried to do some verification, by checking various readings against other sources, chiefly comparing what HA reports and what the Midea app reports. One reason I am less that 100% confident about the data is all those COP spikes.
Here is some spreadsheet data for the first 12 hours of today, a period in which the running total energy consumption got updated on the hour (other periods often have shorter intervals, and from time to time there is missing data, but this is a 'clean' 12 hour period):
The first two cols are the time stamps and the readings, and the 3rd (col in use) is the usage in the previous hour, by subtracting current from previous. These are the 'gold standard' readings.
The next two columns are History Explorer's (HE) bar chart time points and values (mouse-over popup) - they appear to be displaced by one hour, and there is a clearly wrong value (1) for 0030. It happens in other places too. HE may not be getting things 100% right.
The next column is from the app, the hourly use for each hour shown in the pop up on tapping the bar. These are in 100% in agreement with the 'gold standard' in the left most columns. A good sign.
The next three columns are the app past three hour use (simple moving sum of app's last three hours), then my calculated (last three hours using the HA Statistics sensor code), and the time stamp for each calculated 3 hourly figure. Somewhat reassuringly, that data also appears to agree 100% with the App (and so also the left hand most columns)
But I'm still not happy about those COP spikes, they should not be there. I need to do some more analysis...
Midea 14kW (for now...) ASHP heating both building and DHW
Hi again, I can report that I have successfully connected to the modbus line of the Midea clone. I was struggling for last days but seems the mystery was to connect directly to the display unit, not the heat pump mainboard.
Still need to find proper types and decode some values (like DC line voltage, energy consumption) , but looks promissing.
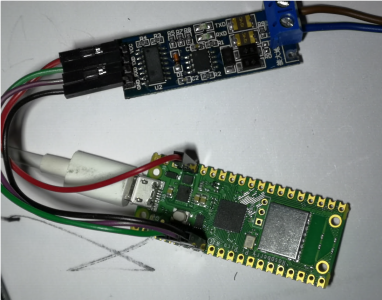
I have used ESPHome and Rpi Pico W and XY-017 RS485 module. Probably ESP8266 would work fine, in the end it's just slow serial transmission.
ESPHome code is pretty strait forward, here is relevant part, skipped headers and other registers, all looks the same:
substitutions:
 heat_pump_name: rotenso

uart:
  rx_pin: GPIO5
  tx_pin: GPIO4
  baud_rate: 9600
  #these are defaults, just show for clarity
  stop_bits: 1
  parity: NONE
  data_bits: 8

modbus:
  id: modbus_heatpump

modbus_controller:
  - id: modbus_1
    ## the Modbus device addr
    address: 0x1
    modbus_id: modbus_heatpump
    setup_priority: -10
    update_interval: 15s

sensor:
#by registry number, like : _100
  - platform: modbus_controller
    id: ${heat_pump_name}_100
    name: "hp_compressor_frequency"
    state_class: measurement
    register_type: holding
    address: 0x64 #dec 100
    unit_of_measurement: "Hz"
    value_type: S_WORD

  - platform: modbus_controller
    id: ${heat_pump_name}_102
    name: "hp_fan_speed_pwm"
    state_class: measurement
    register_type: holding
    address: 0x66
    unit_of_measurement: "pwm"
    value_type: S_WORD

  - platform: modbus_controller
    id: ${heat_pump_name}_104
    name: "hp_TW_in_Entering_Water_Temperature"
    state_class: measurement
    register_type: holding
    address: 0x68
    unit_of_measurement: "°C"
    value_type: S_WORD
next steps: use power from the display unit (found 3.3v already on CN6 or IC8) and pack esp8266 and RS485 modules directly into display unit, without any external cabling.
I had a further look at the following message with these results. Decimal.
010d77910303231e323041231905371919053c223c14310080 3 & 3
'mode': 3, 'mode_auto': 3,
010d77910303231e323041231905371919053c223c14310080 35
'zone_target_temp': [35, ],
010d77910303231e323041231905371919053c223c14310080 30
'zone_target_temp': [ , 30],
010d77910303231e323041231905371919053c223c14310080 50
'dhw_target_temp': 50
010d77910303231e323041231905371919053c223c14310080 48 To obtain answer divide by 2, to provide resolution of .5
'room_target_temp': 24.0,
010d77910303231e323041231905371919053c223c14310080 65
'zone_heating_temp_max': [65, ],
010d77910303231e323041231905371919053c223c14310080 35
'zone_heating_temp_min': [35, ],
010d77910303231e323041231905371919053c223c14310080 25
'zone_cooling_temp_max': [25, ],
010d77910303231e323041231905371919053c223c14310080 5
'zone_cooling_temp_min': [5, ],
010d77910303231e323041231905371919053c223c14310080 55
'zone_heating_temp_max': [ , 55]
010d77910303231e323041231905371919053c223c14310080 25
'zone_heating_temp_min': [ , 25],
010d77910303231e323041231905371919053c223c14310080 25
'zone_cooling_temp_max': [ , 25],
010d77910303231e323041231905371919053c223c14310080 5
'zone_cooling_temp_min': [ , 5],
010d77910303231e323041231905371919053c223c14310080 60 To obtain answer divide by 2, to provide resolution of .5
'room_temp_max': 30.0,
010d77910303231e323041231905371919053c223c14310080 34 To obtain answer divide by 2, to provide resolution of .5
'room_temp_min': 17.0,
010d77910303231e323041231905371919053c223c14310080 60
'dhw_temp_max': 60,
010d77910303231e323041231905371919053c223c14310080 20
'dhw_temp_min': 20,
010d77910303231e323041231905371919053c223c14310080 49
'tank_actual_temperature': 50, I think this value may have changed?
010d77910303231e323041231905371919053c223c14310080 128 I have seen code elsewhere where this value is divided by 10
'outdoor_temperature': 25, to provide the correct answer.
I am still working on the boolean section.
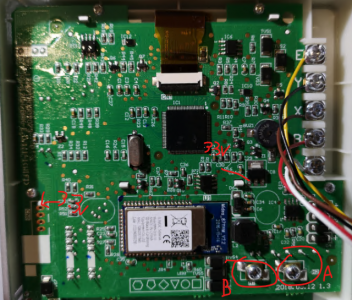
@marekk - thanks for your post, extremely useful. I agree the physical take off (connection of the wires) point should be in the wired controller. My reading of the manuals suggests the A / B connections on the PCBs in the outside units are there to connect slave units when you have more than one outside unit (not very common in domestic installations). From a practical point of view, wire runs etc, connecting to the inside wired controller is much easier. The Homely how to connect Homely (which uses modbus) to a Midea heat pump video also shows the connection being made in the wired controller.
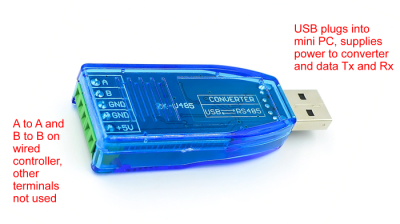
I will end up with a slightly different setup, because I am using a mini PC rather than a Raspberry Pi to run HA, and obviously there is no way the mini PC can fit in the wired controller, as you plan to do (a very neat solution). Nor do I want to have the mini PC next to the wired controller, which is in the airing cupboard, a warm environment, not ideal for a passively cooled mini PC. Instead, the two wires (probably generic 'RS-485 cable') will run from the wired controller to the mini PC in a room about 5 metres away and will then connect to a RS-485 to USB adaptor which will then plug into a USB port on the mini PC. It won't 'drop down' to basic serial (TTL/UART) because the mini PC doesn't have basic serial connections, only USB ports.
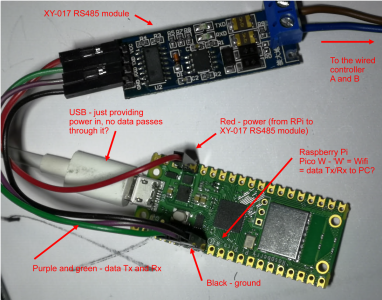
Interested to see you haven't needed either the 120 Ohm resistor across the wires at either end, or a ground, or even a twisted pair/shielded cable. Perhaps that is because your cable run is very short. For extra clarity (for me, and others who may be following this), I have added some labels to your very helpful photo of your setup:
Have I got the details right? I am not sure whether you then send the data over the USB cable visible in the photo or over wifi, given the RPi Pico W has Wifi, to your PC running HA? Now that I see that the R Pi Pico W modules are cheap as chips (<=link), it may in fact be cheaper to do the connection wirelessly, I doubt I can get 5-10m of RS-485 cable for £7.93! However, the modules still need a power supply, either via USB, or from the wired controller, or possibly perhaps from battery pack (simple AA type batteries)?
My proposed set up is:
I'd be interested in any comments you (or @iancalderbank or others) may have on the pros and cons of these various setups, and also where ESP 8266/32 modules fit in - pros and cons etc, bearing in mind this is all aimed at beginner who are not idiots but at the same time are not familar with these bits of kit. Think of it being like telling a stone age man how to light a cigarette - you have to show him what a box of matches looks like, which end of the match does what, and how to strike the match (and how not to burn his fingers, or, in the present case, not to blow anything up).
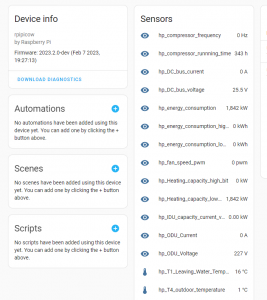
The ESPHome code does look reasonably penetrable. In the HA sensors image, I think maybe there is no current because the unit isn't actually running at the moment you took the screen grab? Or is it because you haven't found the right addresses yet?
Midea 14kW (for now...) ASHP heating both building and DHW
Posted by: @derek-mI think this value may have changed?
Yes, it changes all the time, as it is the DHW tank actual temperature. It shows 50 after a reheat, then declines over time depending on usage until the next reheat.
That is very clever - and all done with no bitwise operations, just hex2dec! The only one I am not sure about is the last one, the 'outdoor_temperature': 25 one, I don't think that data is in that particular message.
If you can work the same magic on the 04/04 type message (the one that has the bitwise operations to get the total energy consumed and produced data) then we will have come a long way along this long and winding road. But I fear it isn't going to be so easy, because we don't have a complete set of labels and value pairs in the 'status update'. Here are two log entries for two messages an hour apart (their native frequency it seems):
2023-02-08 08:00:37.055 DEBUG (Heat Pump Wi-Fi Controller) [custom_components.midea_ac_lan.midea.devices.c3.device] [deviceID] Received: {'header': 'aab9c300000000000004', 'body': '0401000024c400006185ff281e323036ff01000000000000000000000000000000000000000000000000000000000000000000000000000000000000000000000000000000000000000000000000000000000000000000000000000000000000000000000000000000000000000000000000000000000000000000000000000000000000000000000000000000000000000000000000000000000000ec000000000000000000000000000000000014', 'message type': '04', 'body type': '04'}
2023-02-08 08:00:37.056 DEBUG (Heat Pump Wi-Fi Controller) [custom_components.midea_ac_lan.midea.core.device] [deviceID] Status update: {'status_heating': True, 'status_dhw': False, 'status_tbh': False, 'status_ibh': False, 'total_energy_consumption': 9412, 'total_produced_energy': 24965, 'total_mystery1': 1095219289650, 'total_mystery2': 206162034433}
and an hour later:
2023-02-08 09:00:37.694 DEBUG (Heat Pump Wi-Fi Controller) [custom_components.midea_ac_lan.midea.devices.c3.device] [deviceID] Received: {'header': 'aab9c300000000000004', 'body': '0401000024c90000618eff281e323038ff01000000000000000000000000000000000000000000000000000000000000000000000000000000000000000000000000000000000000000000000000000000000000000000000000000000000000000000000000000000000000000000000000000000000000000000000000000000000000000000000000000000000000000000000000000000000000ee000000000000000000000000000000000014', 'message type': '04', 'body type': '04'}
2023-02-08 09:00:37.695 DEBUG (Heat Pump Wi-Fi Controller) [custom_components.midea_ac_lan.midea.core.device] [deviceID] Status update: {'status_heating': True, 'status_dhw': False, 'status_tbh': False, 'status_ibh': False, 'total_energy_consumption': 9417, 'total_produced_energy': 24974, 'total_mystery1': 1095219289650, 'total_mystery2': 206162165505}
The total_mystery values are me doing bitwise operations on subsequent bits of data, as I said I was going to do, clearly what I have got as a result is so far meaningless (though the second one has changed: 206162034433 to 206162165505, so maybe a clue to something there...).
The actual message hex strings with changed values in bold are
0401 0000 24c4 0000 6185 ff28 1e32 3036 ff01
0401 0000 24c9 0000 618e ff28 1e32 3038 ff01
and we showed earlier how the 24c4 => 24c9 contain the total energy consumed and the 6185 => 618e contains the total energy produced by using bitwise shift operators, but these also work using the far simpler and easier to do hex2dec conversion: hex 24c4 => 24c9 is decimal 9412 => 9417 and hex 6185 => 618e is decimal 24965 => 24974, the values in the Status update log entry.
Hex 3036 is decimal 12342 and hex 3038 is decimal 12344, not obviously anything, hex 36 and 38 is decimal 54 and 56, again not obviously anything. ditto when divided by two, 27.0 and 28.0 (the one decimal place trick).
The only other thing that has changed in the messages is the ec to ee near the end. In decimal, this is 236 to 238, again not obviously anything.
The only other things to add is the static hex numbers in the message string are very static, but other do change. Here is the same message from 19th Jan (changed in bold):
0401 0000 2049 0000 5480 0323 1e32 3033 ff01
2049 and 5480 are the earlier energy in/out numbers, but the other numbers, 0323 to ff28 is 803 to 65320, and 3033 is 12339, once again don't jump out as being anything obvious.
To some extent, our problem is that we aren't just looking for a needle in a haystack, we don't even know what we are looking for!
Midea 14kW (for now...) ASHP heating both building and DHW
thank you for labels 🙂
I'm currently running two instances of HA: my primary home on NAS Synology 218+ in a docker environment, second on Raspberry 4B in the location with heat pump and my devices are mostly build on zigbee switches and sensors.
if you are interested in HA on docker then highly recommend checking this guy blog and videos: https://www.homeautomationguy.io
I have followed his guides and switched from Hassos to docker environment, more flexible environment but challenging in configuration.
Please consider the the above my solution presentation as dirty proof of concept and probably not the finall one: I wanted to make it connect and see figures, now time to cleanup, adjust and redesign toward simplification.
I have used RPi Pico W (correct W is for Wifi) because wanted to see how it behaves with ESPHome, it's performance and stability (so far so good) and i had one laying around with no purpose, but please notice it's in very early stage of support (in developpment) . Very likely will switch later to simple ESP8266, well known and supported.
as for RS485: it was designed to be resilient for interferences and with these speeds you should be able to go over 1km of distance, even without GND.
And honestly for distance of couple of meters and the speed of 9600 bits per second it does not really matter what type of cable you use and definitely don't look for dedicated RS485, literaly any will do.
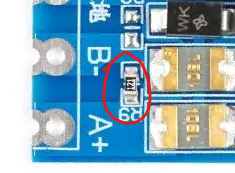
If you check the XY-017 specification you will find it already have 120ohm resistor between AB, so no additional is necessary:
In general recommend this module it has build protection and flow control, preferable over cheaper MAX485 you will find plenty over Internet.
Yes: USB is for 5V power, nothing else, no communication.
RPi Pico W connects over Wifi to my network and HA, and because of that you can forget about batteries... Any remote and frequent connection - especially WiFi - will drain batteries in no time.
And for devices I'm not big fan of USB connected communication ones, seems these degrade over longer period of time and are prone to failures, especially in hostile environment like higher humidity or wide range of temperatures. If course good and cheap for start, no doubt but later should be replace by some fixed connections.
- 27 Forums
- 2,495 Topics
- 57.8 K Posts
- 383 Online
- 6,220 Members
Join Us!
Worth Watching
Latest Posts
-
RE: Solis inverters S6-EH1P: pros and cons and battery options
@batpred I reckon Andy might know a thing or 2 about...
By Bash , 3 minutes ago
-
RE: What determines the SOC of a battery?
@batpred Ironically you didn't have anything good to...
By Bash , 59 minutes ago
-
RE: Testing new controls/monitoring for Midea Clone ASHP
Here’s a current graph showing a bit more info. The set...
By benson , 1 hour ago
-
RE: Setback savings - fact or fiction?
True there is a variation but importantly it's understa...
By RobS , 1 hour ago
-

Below is a better quality image. Does that contain all ...
By trebor12345 , 2 hours ago
-
Sorry to bounce your thread. To put to bed some concern...
By L8Again , 2 hours ago
-
@painter26 — they (the analogue gauges) are subtly diff...
By cathodeRay , 2 hours ago
-

RE: Electricity price predictions
I am always impressed with how you keep abreast of so m...
By Batpred , 3 hours ago
-
RE: Humidity, or lack thereof... is my heat pump making rooms drier?
@majordennisbloodnok I’m glad I posted this. There see...
By AndrewJ , 3 hours ago
-
Our Experience installing a heat pump into a Grade 2 Listed stone house
First want to thank everybody who has contributed to th...
By Travellingwave , 6 hours ago
-
RE: Struggling to get CoP above 3 with 6 kw Ecodan ASHP
Welcome to the forums.I assume that you're getting the ...
By Sheriff Fatman , 9 hours ago
-
RE: Say hello and introduce yourself
@editor @kev1964-irl This discussion might be best had ...
By GC61 , 10 hours ago
-

RE: Oversized 10.5kW Grant Aerona Heat Pump on Microbore Pipes and Undersized Rads
@uknick TBH if I were taking the floor up ...
By JamesPa , 1 day ago
-

RE: Getting ready for export with a BESS
I would have not got it if it was that tight
By Batpred , 1 day ago
-
RE: Need help maximising COP of 3.5kW Valiant Aerotherm heat pump
@judith thanks Judith. Confirmation appreciated. The ...
By DavidB , 1 day ago
-

RE: Recommended home battery inverters + regulatory matters - help requested
That makes sense. I thought better to comment in this t...
By Batpred , 1 day ago
-
Bosch CS5800i 7kW replacing Greenstar Junior 28i
My heat pump journey began a couple of years ago when I...
By Slartibartfast , 1 day ago
-

RE: How to control DHW with Honeywell EvoHome on Trianco ActiveAir 5 kW ASHP
The last photo is defrost for sure (or cooling, but pre...
By JamesPa , 1 day ago
-

RE: Plug and play solar. Thoughts?
Essentially, this just needed legislation. In Germany t...
By Batpred , 1 day ago
-
RE: A Smarter Smart Controller from Homely?
@toodles Intentional opening of any warranty “can of wo...
By Papahuhu , 1 day ago
-
RE: Safety update; RCBOs supplying inverters or storage batteries
Thanks @transparent Thankyou for your advic...
By Bash , 1 day ago
-
RE: Air source heat pump roll call – what heat pump brand and model do you have?
Forum Handle: Odd_LionManufacturer: SamsungModel: Samsu...
By Odd_Lion , 1 day ago
-
RE: Configuring third party dongle for Ecodan local control
Well, it was mentioned before in the early pos...
By F1p , 2 days ago

