In my third article on home automation I am going to look at how to take the vanilla system and start integrating your devices with it, bringing control into one place. I’m also going to look at what that now lets you do.
To recap on the previous articles and to act as a to-do list, I’m looking at the following: the home automation system I’ve chosen is Home Assistant, and that has already been set up in its out-of-the-box state. It so happens I used an old PC and installed Home Assistant onto it, but that’s irrelevant; it is now in exactly the same state as if I’d bought Home Assistant Green as a pre-installed plug-and-play offering.
I have a Mitsubishi Ecodan air source heat pump that has already been installed and set up to talk to Mitsubishi’s Melcloud web portal. It provides both domestic hot water and home heating. I have a Growatt hybrid inverter and, attached to it, a Growatt battery. Also attached to the inverter is a 6.5 kWp solar array. I’m both importing and exporting electricity via Octopus Energy and have their Agile tariffs in both directions, meaning I get half-hourly day-ahead pricing. I have a SMETS2 second-generation smart meter that was installed by Octopus.

The Home Assistant box is connected to the network, so connecting to it for installing stuff is a matter of getting onto a computer, starting up your browser, and connecting to the address Home Assistant tells you to: http://homeassistant.local:8123. At that point, you will be prompted for the username and password you set up when you got the thing running in the last article. Once you’ve logged in, you will see Home Assistant’s home page. It’s worth taking a few minutes to simply look around and familiarise yourself with the layout since there is a lot more that you can do with Home Assistant than you will necessarily want to do; it’s a very far-reaching and flexible application, and as such, it’s not difficult to let yourself become overwhelmed. Nonetheless, the things we need to worry about right now are limited, so we’ll deal with them first.
On the left-hand side is a bar of buttons that allow you to gain access to various parts of the system. The page you’re on is accessed by clicking on the top button (looking like four rectangles arranged into a square) which, if you hover over it, is called “Overview.” Further down is a lightning bolt symbol getting you to an “Energy” page, which for the moment we can ignore; setting that up will come after we’re talking with some stuff. Towards the bottom is a cog symbol that gets us to a Settings page.
At this point, I’m going to quickly cover the terminology used. When you got your first smartphone, tablet, computer, or, indeed, any bit of techie wizardry, you had to learn some new jargon, and Home Assistant is no different. As a result, a bit of a glossary is in order.
Basically, all Home Assistant does is regularly gather the data you ask it to and then do stuff with that data. Most of the time, all it’s doing is displaying it, but sometimes, if you ask it to, it might send a command back to something you want to control. There’s a huge amount that can be done within just a simple remit like that, but ultimately it’s that simple: query, display, a bit of calculating, and do a wee bit of controlling. Now Home Assistant itself doesn’t know anything much about your kit and how to deal with it until you give it the tools it needs, and here is where we come to our first bit of jargon. The toolkit you need to give to Home Assistant to work with something is called an “integration.” An integration is basically equivalent to an app that you might install on your phone; if you want Home Assistant to talk with the Met Office, you’ll install the Met Office integration; if you want Home Assistant to talk with your Samsung smart TV, there’s an integration for that, so that’s what you’ll install, while if you also have an LG smart TV, that’s a different integration, so you’ll install that too.
Once you’ve installed an integration, Home Assistant will ask you for some pertinent details relevant to what you’re setting up (does the TV have a particular address? Does it need a login and password and, if so, what are they?) and will then hunt around and actually find the kit you want it to talk to. At that point, it will have a chat with that kit and discover one or more devices. A device is a specific piece of hardware or specific service that Home Assistant can talk with. In the case of the smart TV, your Samsung smart TV would be a device. If you had two Samsung smart TVs, the integration might well provide you with access to two devices. If you installed the Met Office integration, it would provide you with a “device” (in fact, it’ll call it a service because it’s less confusing) which represents the particular location you want to get forecasts for.
Each device will be made up of multiple entities, which are specific details about the device you want to know about, watch, or control. For instance, if you set up an integration for Octopus Energy and configured a device (or service) for your electricity import, that will include entities for the current standing charge, the current import rate, the current export rate, the cumulative cost of today’s imported electricity, and so on.
It’s a bit like having to get a driving license (the integration) to be able to interact with transporting yourself around, and then you can buy a car (the device), but you’ll need to work with the key, the steering wheel, the gears, the accelerator, brake, and perhaps clutch (the entities) to actually do the controlling of the car. If you bought an automatic car, you won’t have a clutch. If you bought an electric car, you may not even have a gearstick, so which entities you have to work with will depend on the device you’re trying to control. If you want to transport yourself by air, it’s a different integration (a private pilot’s license), a different device (a Cessna Skyhawk, for instance), and a completely different set of entities (what, no clutch? And what do these pedals do?).
When Home Assistant uses an integration to talk to a device and retrieve data for all these entities, it will want to display what it gets back somewhere. That home screen you saw initially is what Home Assistant calls a “dashboard” and, although you can create more, there’s only one of them to start with. Collected data is shown by adding a “card” to the dashboard. If you think about the different kinds of data that can be collected (numbers of various sorts, on/off buttons, grid references on a map, times and dates, and so on), it becomes obvious that different cards are used for displaying different sorts of things.
So, armed with those nuggets of jargon, we can now look at what we want to do. Configuring new stuff needs us to go to the settings page, so I click on that cog symbol in the bottom left-hand corner of the screen. Various subsections are listed in the middle of the screen, but my first port of call is to go to Devices and Services. Now it’s highly likely that, when you first started up Home Assistant during the previous article and set it up, it will have found stuff on your network and set it up, so this Devices and Services page may well already have some things on it. In the top middle of the page, you’ll see four links – Integrations, Devices, Entities, and Helpers – and at the moment you’ll be looking at the already-installed integrations.
Since I have some solar panels, it would be handy to see what they are forecasted to generate in the near future, and as it happens, there is a handy place on the internet that does exactly that: https://re.jrc.ec.europa.eu/pvg_tools/en/tools.html.
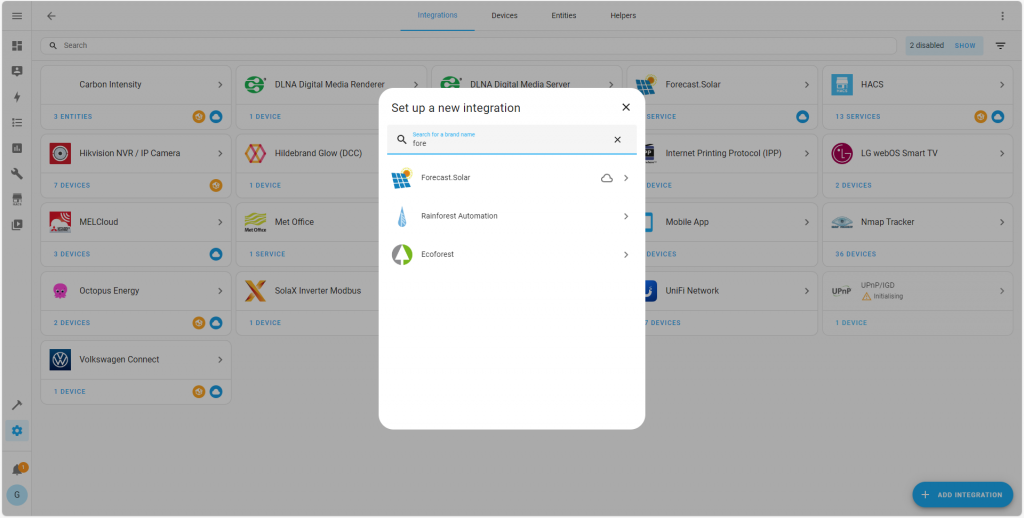
Those helpful people not only provide a web page with interactive tools, but they also maintain an API (application programming interface – a very specialised kind of website that allows systems to talk with other systems automatically). As a result, there is an integration that makes it possible for Home Assistant to talk with that API so all that lovely information can be made available to you. All I need to do is, in Home Assistant, find the button in the bottom right-hand corner marked Add Integration and click it. That brings up a box where I can type in “forecast” next to the magnifying glass and I can then see Forecast.Solar below.
Clicking on the Forecast.Solar integration then presents me with a screen that asks some pertinent details. In this case, it wants to know the name I want to give to the location of my solar panels (I chose “Home”), where the panels are (i.e., the latitude and the longitude), the slope of my roof, the direction my panels point, and the peak power in watts of the array. Putting these details in and hitting submit then installs the integration and I’m greeted with a Success window. It gives me the option to assign those panels to an “area,” but we won’t worry about that for now. I’m just going to hit “Finish.”
Now, looking in my list of integrations, I can see Forecast.Solar as a new entry and it tells me it contains one service. If I click on the integration, I get more detail, telling me it is providing one service and a total of 11 entities. If I click on the “1 service” link, it takes me further into the detail, and in the middle of the page now, it gives me a list of what it calls Sensors. Not surprising, of course; this solar forecast is not something I’d expect to control; it’s merely information. As a result, these “entities” I’m provided with are all one-way – sensing what those clever boffins are saying and delivering it to me.
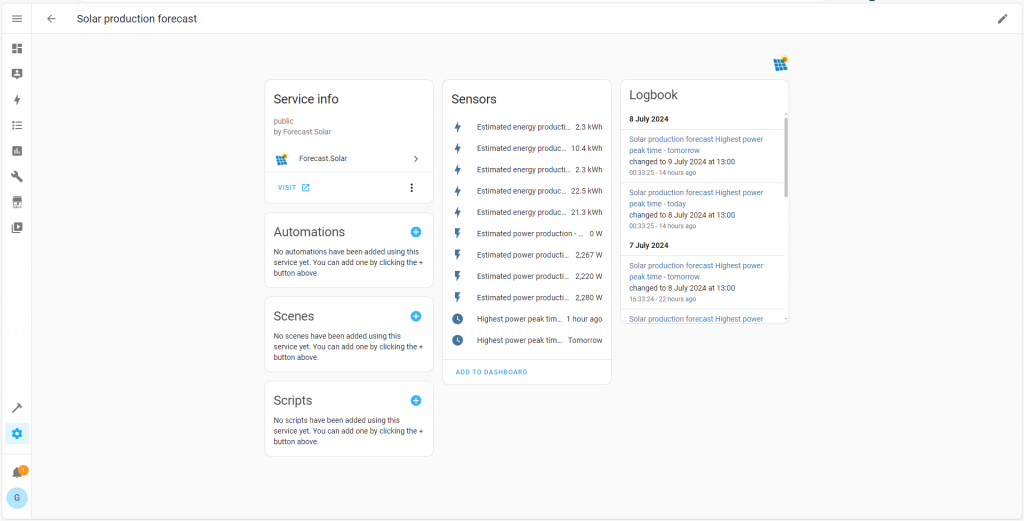
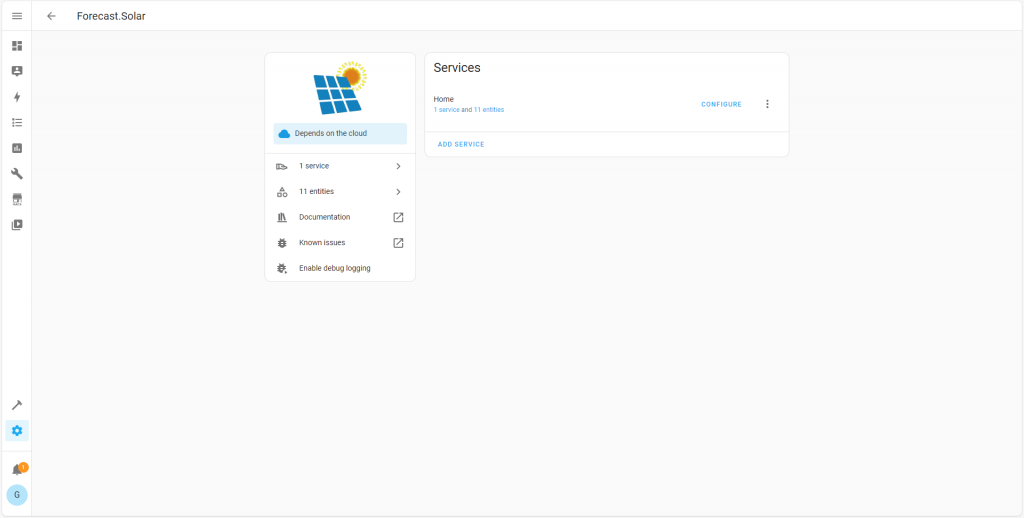
At this point, Home Assistant is already regularly talking with that solar forecast site and gathering data, but it’s not actually displaying any of it. At the bottom of the list of sensors is a link that says “Add to dashboard,” and this is the key part. Clicking on that link asks me where I want to display all this information, and at the moment, there will only be one page for me to choose. Not a problem, I’ll put it there and see how it looks.
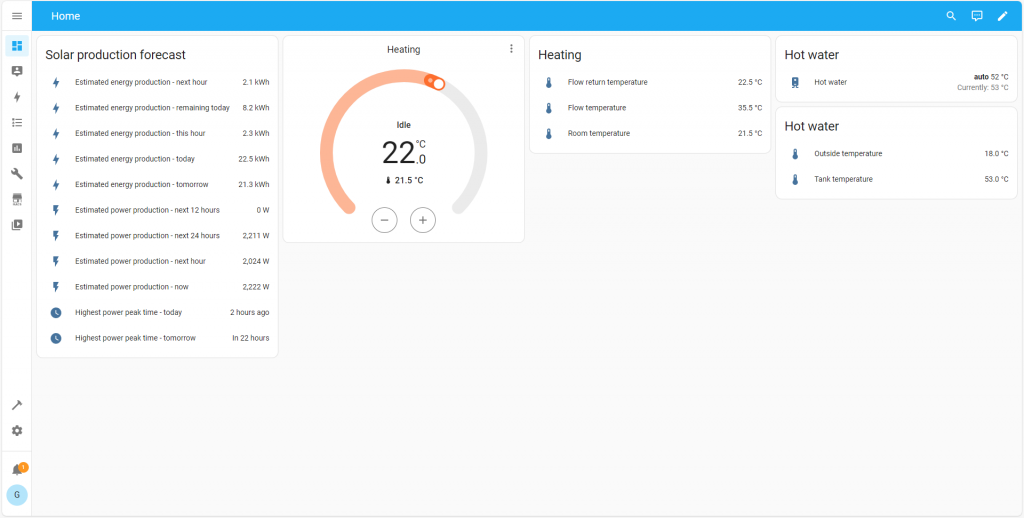
Clicking “Next” tells me that Home Assistant has picked a “card” that it reckons is the most appropriate for displaying the sensors, and the suggestion is almost certainly going to be entirely the right choice until a point if and when you are familiar enough with Home Assistant to start getting clever. Definitely a topic for another time, so all I do right now is click “Add to Dashboard” and it’s done. Now, when I click that icon looking like four paving slabs at the top of the left-hand button bar, I can see my newly created solar production forecast as a list of names and values; for instance, it is now telling me the highest power peak time today was one hour ago and that the panels are forecast to be generating at 2.28 kW now, falling to 2.22 kW in the next hour.
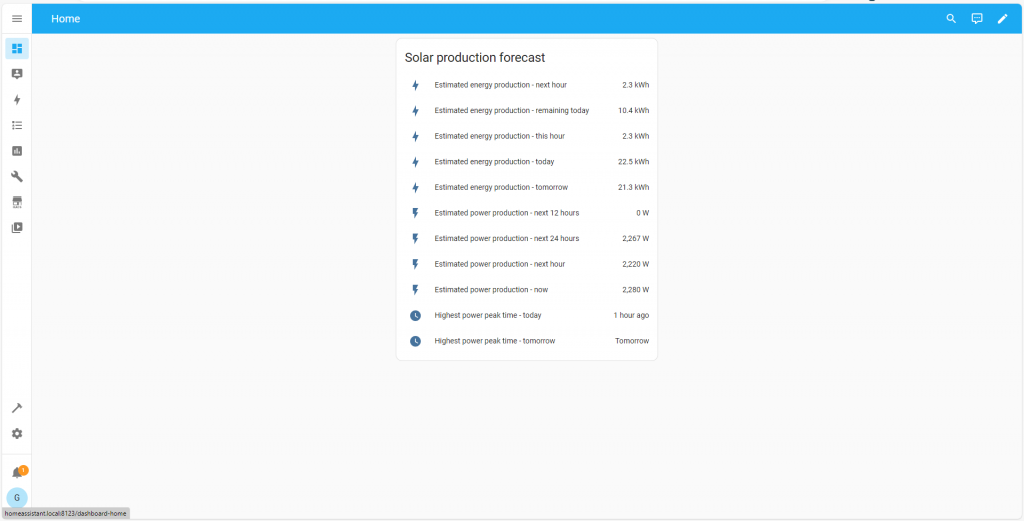
So, recapping, I added the integration (giving Home Assistant some new skills to talk to a new API), that integration enabled it to identify a service (the forecast figures for the solar array on my home) and make visible several entities (the individual figures making up the forecast; estimated production now, during the next hour, during the remainder of the day, and so on). The estimate of how much power will be generated by the end of today and the same estimate for tomorrow are obviously two separate figures, but they’re both part of the same forecast and so are different entities. However, they both relate specifically to my home’s location and not somewhere else, so they are different parts of the same single service.
Next, I’m going to go back to my Devices and Services page and add another integration, this time for my heat pump. Since it is a Mitsubishi Ecodan, I’m going to search for the Melcloud integration, and in this case, it just asks me for my email address and password so it can connect to Mitsubishi’s cloud service in exactly the same way as my Melcloud app does on my phone. Once again, I go through answering any questions asked of me and end up seeing another integration on my Devices and Services page. Clicking on that integration reveals two devices (in my case, Heating and Hot water). If I click on the “2 devices” link, I see those devices listed and clicking on each of those devices takes me to the now familiar page that lets me add the entities to my dashboard. In this case, my “Heating” device has two different types of entities (some controls and some sensors), so I am encouraged to add two separate “cards” to the dashboard rather than just one since one “card” can be for doing some controlling while the other can be purely informational. Taking another look at the dashboard shows it’s now quite a bit fuller and that, in theory, I can actually do something with the heating (change the temperature).
Each extra bit of kit I want to add to Home Assistant follows the same process. Go to the settings page, dive into the Devices and Services section, add the appropriate integration, and then add the entities to the dashboard. This doesn’t have to be just for your renewable energy and heating stuff; anything Home Assistant has an integration for is fair game: CCTV cameras, smart doorbells, smart lighting, home entertainment stuff, smart plugs, and so on. I even have a friend who likes to control his curtains with a Home Assistant integration, and now I have an electric vehicle I’ve integrated that too.
The first hurdle we can run into, however, is when Home Assistant doesn’t have an integration to allow it to talk to something you want to monitor or control, and I first ran into this issue when I wanted to start interacting with my energy provider – Octopus Energy. In instances like this, we start to see a bit of “people power” coming to our rescue. There’s only so much time the developers of Home Assistant can devote, but they have designed it so that anyone with a will to do so (and the right skills) can build their own integration. As a result, there’s a pretty good chance that if you’re disappointed you can’t find an integration you need, then someone else has already thought the same and put one together. All these custom integrations are available via one of the buttons on the left-hand button bar – the one marked “HACS” (Home Assistant Community Store) – and that’s one of the topics I’m going to explore in the next (and final) article.
As well as covering custom integrations, the next article will also look at controlling some bits of kit locally and getting Home Assistant to work with all these integrations in a more joined-up way by automating some decisions. There will be a lot of ground to cover, so it won’t be a short article, but hopefully, it will pull everything you’ve been introduced to together in a way that makes sense.


Good stuff😁